1. Introduction
Spring Cloud Alibaba aims to provide a one-stop solution for microservices development. This project includes the required components for developing distributed applications and services, so that developers can develop distributed applications easily with the Spring Cloud programming models.
With Spring Cloud Alibaba, you only need to add a few annotations and configurations, and you will be able to use the distributed solutions of Alibaba for your applications, and build a distributed system of your own with Alibaba middleware.
The features of Spring Cloud Alibaba:
-
Flow control and service degradation:support WebServlet, WebFlux, OpenFeign, RestTemplate, Dubbo access to the function of limiting and degrading flow. It can modify the rules of limiting and degrading flow in real time through the console at run time, and it also supports the monitoring of limiting and degrading Metrics.
-
Service registration and discovery:Service can be registered and clients can discover the instances using Spring-managed beans, auto integration Ribbon.
-
Distributed configuration:support for externalized configuration in a distributed system, auto refresh when configuration changes.
-
Rpc Service:extend Spring Cloud client RestTemplate and OpenFeign to support calling Dubbo RPC services.
-
Event-driven:support for building highly scalable event-driven microservices connected with shared messaging systems.
-
Distributed Transaction:support for distributed transaction solution with high performance and ease of use.
-
Alibaba Cloud Object Storage:massive, secure, low-cost, and highly reliable cloud storage services. Support for storing and accessing any type of data in any application, anytime, anywhere.
-
Alibaba Cloud SchedulerX:accurate, highly reliable, and highly available scheduled job scheduling services with response time within seconds.
-
Alibaba Cloud SMS: A messaging service that covers the globe, Alibaba SMS provides convenient, efficient, and intelligent communication capabilities that help businesses quickly contact their customers.
Spring Cloud Alibaba also provide rich examples.
2. Dependency Management
If you’re a Maven Central user, add our BOM to your pom.xml <dependencyManagement> section. This will allow you to omit versions for any of the Maven dependencies and instead delegate versioning to the BOM.
<dependencyManagement>
    <dependencies>
        <dependency>
            <groupId>com.alibaba.cloud</groupId>
            <artifactId>spring-cloud-alibaba-dependencies</artifactId>
            <version>2021.0.4.0</version>
            <type>pom</type>
            <scope>import</scope>
        </dependency>
    </dependencies>
</dependencyManagement>
In the following sections, it will be assumed you are using the Spring Cloud Alibaba BOM and the dependency snippets will not contain versions.
3. Spring Cloud Alibaba Nacos Discovery
Nacos is an easy-to-use dynamic service discovery, configuration and service management platform for building cloud native applications.
With Spring Cloud Alibaba Nacos Discovery, you can quickly access the Nacos service registration feature based on Spring Cloud’s programming model.
3.1. Service Registration/Discovery: Nacos Discovery
Service discovery is one of the key components in the microservices architecture. In such a architecture, configuring a service list for every client manually could be a daunting task, and makes dynamic scaling extremely difficult. Nacos Discovery helps you to register your service to the Nacos server automatically, and the Nacos server keeps track of the services and refreshes the service list dynamically. In addition, Nacos Discovery registers some of the metadata of the service instance, such as host, port, health check URL, homepage to Nacos. For details about how to download and start Nacos, refer to the Nacos Website.
3.2. How to Introduce Nacos Discovery for service registration/discovery
please use the starter with the group ID as com.alibaba.cloud and the artifact ID as spring-cloud-starter-alibaba-nacos-discovery.
<dependency>
    <groupId>com.alibaba.cloud</groupId>
    <artifactId>spring-cloud-starter-alibaba-nacos-discovery</artifactId>
</dependency>
3.3. An example of using Nacos Discovery for service registration/discovery and call
Nacos Discovery integrate with the Netflix Ribbon, RestTemplate or OpenFeign can be used for service-to-service calls.
3.3.1. Nacos Server Startup
For details about how to download and start Nacos, refer to the Nacos Website.
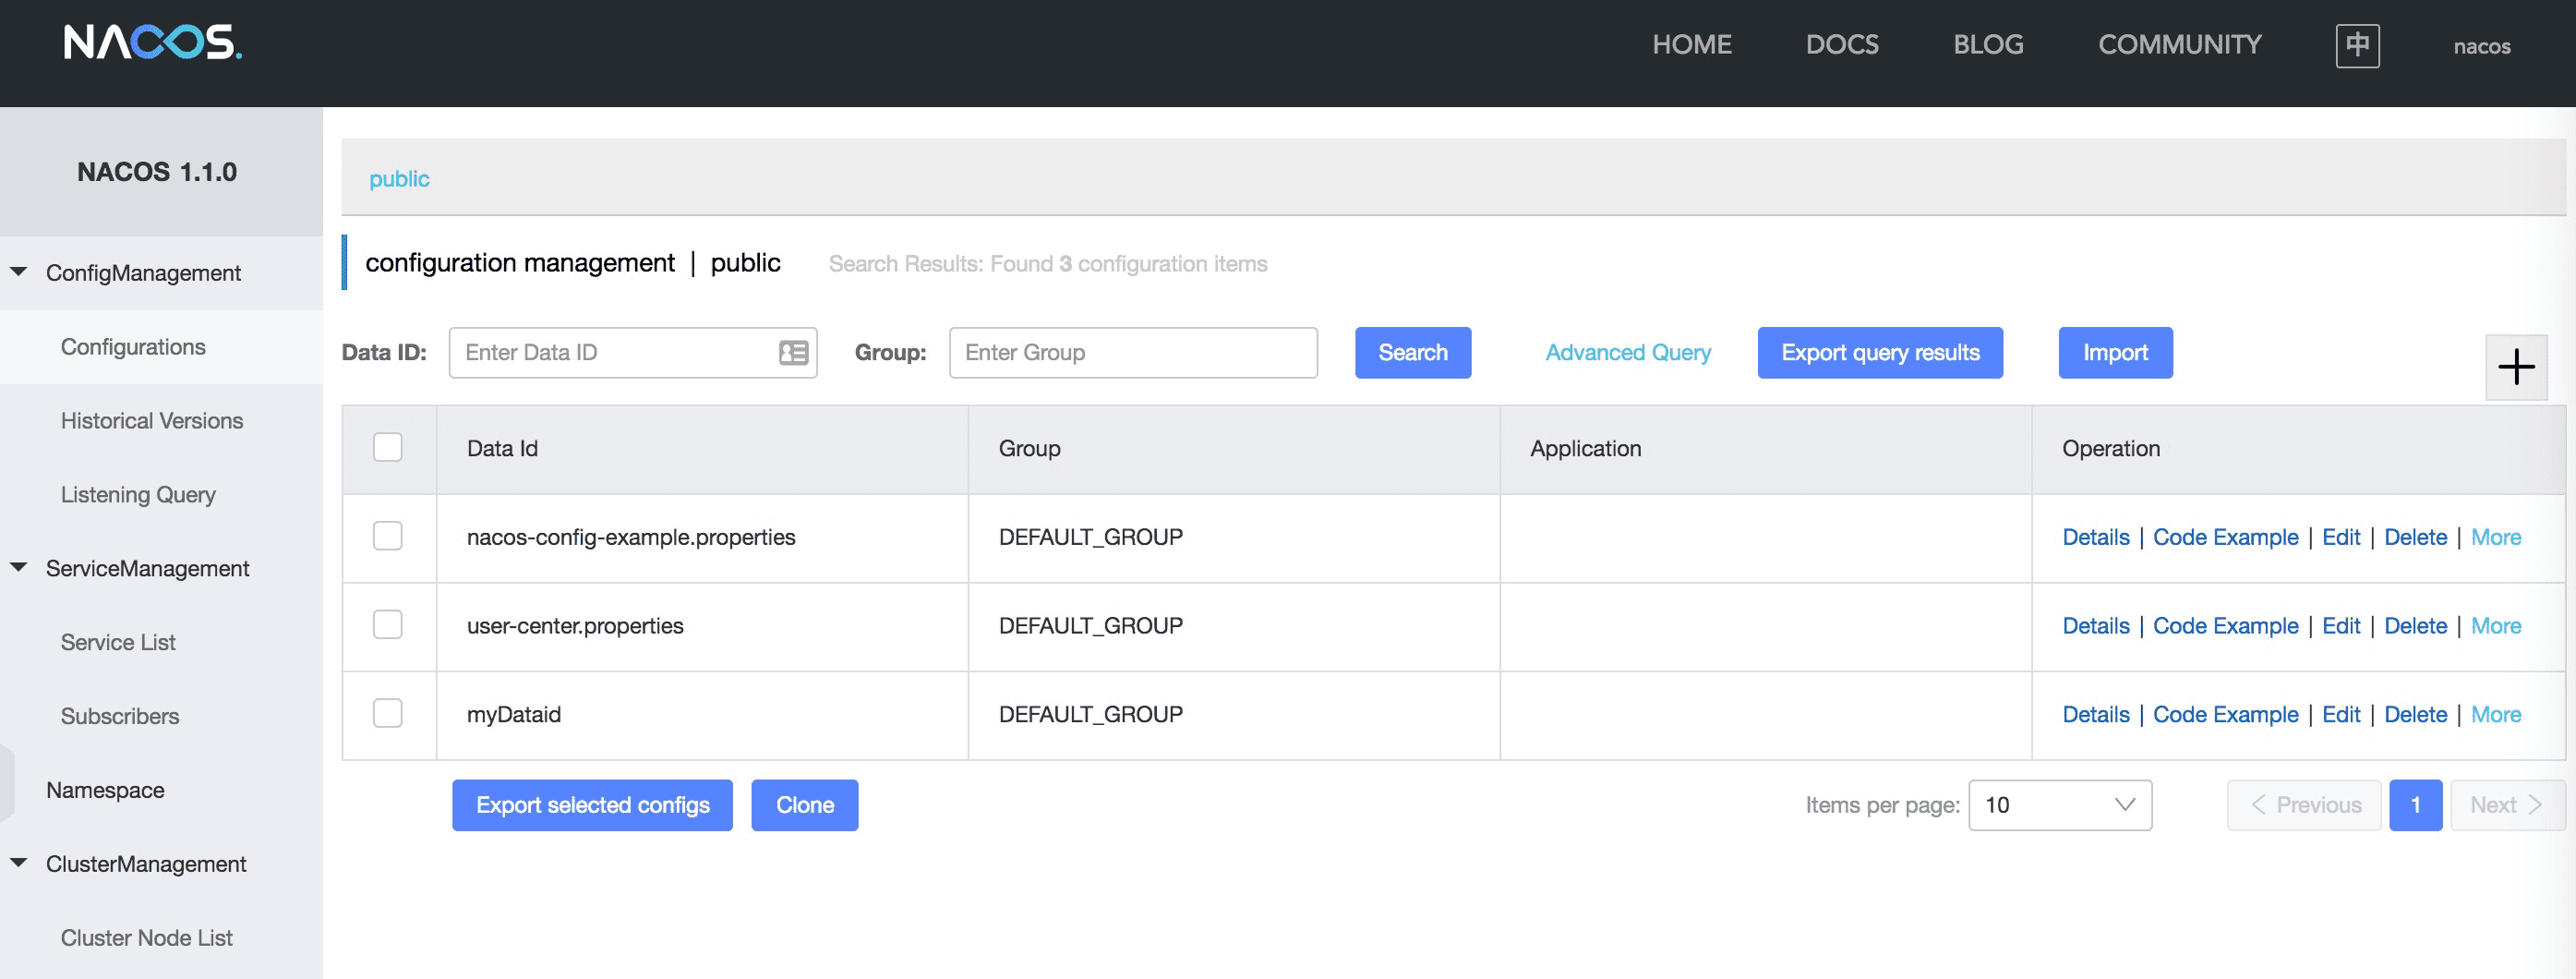
After Nacos Server starts, go to http://ip:8848 to view the console (default account name/password is nacos/nacos):
For more Nacos Server versions, you can download the latest version from release page.
3.3.2. Start a Provider Application
The following sample illustrates how to register a service to Nacos.
-
Configuration of pom.xml The following is a complete example of pom.xml:
<?xml version="1.0" encoding="UTF-8"?>
<project xmlns="http://maven.apache.org/POM/4.0.0" xmlns:xsi="http://www.w3.org/2001/XMLSchema-instance"
         xsi:schemaLocation="http://maven.apache.org/POM/4.0.0 http://maven.apache.org/xsd/maven-4.0.0.xsd">
    <modelVersion>4.0.0</modelVersion>

    <groupId>open.source.test</groupId>
    <artifactId>nacos-discovery-test</artifactId>
    <version>1.0-SNAPSHOT</version>
    <name>nacos-discovery-test</name>

    <parent>
        <groupId>org.springframework.boot</groupId>
        <artifactId>spring-boot-starter-parent</artifactId>
        <version>${spring.boot.version}</version>
        <relativePath/>
    </parent>

    <properties>
        <project.build.sourceEncoding>UTF-8</project.build.sourceEncoding>
        <project.reporting.outputEncoding>UTF-8</project.reporting.outputEncoding>
        <java.version>1.8</java.version>
    </properties>

    <dependencyManagement>
        <dependencies>
            <dependency>
                <groupId>org.springframework.cloud</groupId>
                <artifactId>spring-cloud-dependencies</artifactId>
                <version>${spring.cloud.version}</version>
                <type>pom</type>
                <scope>import</scope>
            </dependency>
            <dependency>
                <groupId>com.alibaba.cloud</groupId>
                <artifactId>spring-cloud-alibaba-dependencies</artifactId>
                <version>${spring.cloud.alibaba.version}</version>
                <type>pom</type>
                <scope>import</scope>
            </dependency>
        </dependencies>
    </dependencyManagement>

    <dependencies>
        <dependency>
            <groupId>org.springframework.boot</groupId>
            <artifactId>spring-boot-starter-web</artifactId>
        </dependency>

        <dependency>
            <groupId>org.springframework.boot</groupId>
            <artifactId>spring-boot-starter-actuator</artifactId>
        </dependency>

        <dependency>
            <groupId>com.alibaba.cloud</groupId>
            <artifactId>spring-cloud-starter-alibaba-nacos-discovery</artifactId>
        </dependency>
    </dependencies>

    <build>
        <plugins>
            <plugin>
                <groupId>org.springframework.boot</groupId>
                <artifactId>spring-boot-maven-plugin</artifactId>
            </plugin>
        </plugins>
    </build>
</project>-
Configuration of application.properties Some of the basic configurations of Nacos must be included in application.properties(or application.yaml), as shown below:
server.port=8081
spring.application.name=nacos-provider
spring.cloud.nacos.discovery.server-addr=127.0.0.1:8848
management.endpoints.web.exposure.include=*|
Note
|
If you do not want to use Nacos for service registration and discovery, you can set spring.cloud.nacos.discovery to false.
|
-
The following is a sample for starting Provider:
@SpringBootApplication
@EnableDiscoveryClient
public class NacosProviderDemoApplication {

    public static void main(String[] args) {
        SpringApplication.run(NacosProviderDemoApplication.class, args);
    }

    @RestController
    public class EchoController {
        @GetMapping(value = "/echo/{string}")
        public String echo(@PathVariable String string) {
            return "Hello Nacos Discovery " + string;
        }
    }
}
Now you can see the registered services on the Nacos console.
|
Note
|
Before you start the provider application, please start Nacos first. Refer to Naco Website for more details. |
3.3.3. Start a Consumer Application
It might not be as easy as starting a provider application, because the consumer needs to call the RESTful service of the provider. In this example, we will use the most primitive way, that is, combining the LoadBalanceClient and RestTemplate explicitly to access the RESTful service. You can refer to section 1.2 for pom.xml and application.properties configurations. The following is the sample code for starting a consumer application.
|
Note
|
You can also access the service by using RestTemplate and FeignClient with load balancing. |
@SpringBootApplication
@EnableDiscoveryClient
public class NacosConsumerApp {

    @RestController
    public class NacosController{

        @Autowired
        private LoadBalancerClient loadBalancerClient;
        @Autowired
        private RestTemplate restTemplate;

        @Value("${spring.application.name}")
        private String appName;

        @GetMapping("/echo/app-name")
        public String echoAppName(){
            //Access through the combination of LoadBalanceClient and RestTemplate
            ServiceInstance serviceInstance = loadBalancerClient.choose("nacos-provider");
            String path = String.format("http://%s:%s/echo/%s",serviceInstance.getHost(),serviceInstance.getPort(),appName);
            System.out.println("request path:" +path);
            return restTemplate.getForObject(path,String.class);
        }

    }

    //Instantiate RestTemplate Instance
    @Bean
    public RestTemplate restTemplate(){

        return new RestTemplate();
    }

    public static void main(String[] args) {

        SpringApplication.run(NacosConsumerApp.class,args);
    }
}
In this example, we injected a LoadBalancerClient instance, and instantiated a RestTemplate manually. At the same time, we injected the configuration value of spring.application.name into the application,
so that the current application name can be displayed when calling the service of the provider.
|
Note
|
Please start Nacos before you start the consumer application. For details, please refer to Nacos Website. |
Next, access the http://ip:port/echo/app-name interface provided by the consumer. Here we started the port of 8082. The access result is shown below:
Address:http://127.0.0.1:8082/echo/app-name
Access result: Hello Nacos Discovery nacos-consumer
3.4. Nacos Discovery Endpoint
Nacos Discovery provides an Endpoint internally with a corresponding endpoint id of nacosdiscovery.
Endpoint exposed json contains two properties:
-
subscribe: Shows the current service subscribers
-
NacosDiscoveryProperties: Shows the current basic Nacos configurations of the current service
The followings shows how a service instance accesses the Endpoint:
{
  "subscribe": [
    {
      "jsonFromServer": "",
      "name": "nacos-provider",
      "clusters": "",
      "cacheMillis": 10000,
      "hosts": [
        {
          "instanceId": "30.5.124.156#8081#DEFAULT#nacos-provider",
          "ip": "30.5.124.156",
          "port": 8081,
          "weight": 1.0,
          "healthy": true,
          "enabled": true,
          "cluster": {
            "serviceName": null,
            "name": null,
            "healthChecker": {
              "type": "TCP"
            },
            "defaultPort": 80,
            "defaultCheckPort": 80,
            "useIPPort4Check": true,
            "metadata": {

            }
          },
          "service": null,
          "metadata": {

          }
        }
      ],
      "lastRefTime": 1541755293119,
      "checksum": "e5a699c9201f5328241c178e804657e11541755293119",
      "allIPs": false,
      "key": "nacos-provider",
      "valid": true
    }
  ],
  "NacosDiscoveryProperties": {
    "serverAddr": "127.0.0.1:8848",
    "endpoint": "",
    "namespace": "",
    "logName": "",
    "service": "nacos-provider",
    "weight": 1.0,
    "clusterName": "DEFAULT",
    "metadata": {

    },
    "registerEnabled": true,
    "ip": "30.5.124.201",
    "networkInterface": "",
    "port": 8082,
    "secure": false,
    "accessKey": "",
    "secretKey": ""
  }
}
3.5. Weight Route
3.5.1. Spring Cloud Loadbalancer
<dependencies>
    <dependency>
        <groupId>org.springframework.cloud</groupId>
        <artifactId>spring-cloud-loadbalancer</artifactId>
    </dependency>
</dependencies>spring.cloud.loadbalancer.ribbon.enabled=false
spring.cloud.loadbalancer.nacos.enabled=true3.6. More Information about Nacos Discovery Starter Configurations
The following shows the other configurations of the starter of Nacos Discovery:
Configuration |
Key |
Default Value |
Description |
Server address |
|
IP and port of the Nacos Server listener |
|
Service name |
|
|
Name the current service |
Weight |
|
|
Value range: 1 to 100. The bigger the value, the greater the weight |
Network card name |
|
If the IP address is not specified, the registered IP address is the IP address of the network card. If this is not specified either, the IP address of the first network card will be used by default. |
|
Registered IP address |
|
Highest priority |
|
Registered IP address Type |
|
|
IPv4 and IPv6 can be configured, If there are multiple IP addresses of the same type of network card, and you want to specify a specific network segment address, you can use |
Registered port |
|
|
Will be detected automatically by default. Do not need to be configured. |
Namespace |
|
A typical scenario is to isolate the service registration for different environment, such as resource (configurations, services etc.) isolation between testing and production environment |
|
AccessKey |
|
Alibaba Cloud account accesskey |
|
SecretKey |
|
Alibaba Cloud account secretkey |
|
Metadata |
|
You can define some of the metadata for your services in the Map format |
|
Log file name |
|
||
Cluster Name |
|
|
Cluster name of Nacos |
Endpoint |
|
The domain name of a certain service in a specific region. You can retrieve the server address dynamically with this domain name |
|
Integrate LoadBalancer or not |
|
|
|
Enable Nacos Watch |
|
|
set to false to close watch |
4. Spring Cloud Alibaba Nacos Config
Nacos is an easy-to-use dynamic service discovery, configuration and service management platform for building cloud native applications.
Use Spring Cloud Alibaba Nacos Config to quickly access Nacos configuration management capabilities based on Spring Cloud’s programming model.
4.1. How to Introduce Nacos Config for configuration
please use the starter with the group ID as com.alibaba.cloud and the artifact ID as spring-cloud-starter-alibaba-nacos-config.
<dependency>
    <groupId>com.alibaba.cloud</groupId>
    <artifactId>spring-cloud-starter-alibaba-nacos-config</artifactId>
</dependency>
4.2. Quickstart
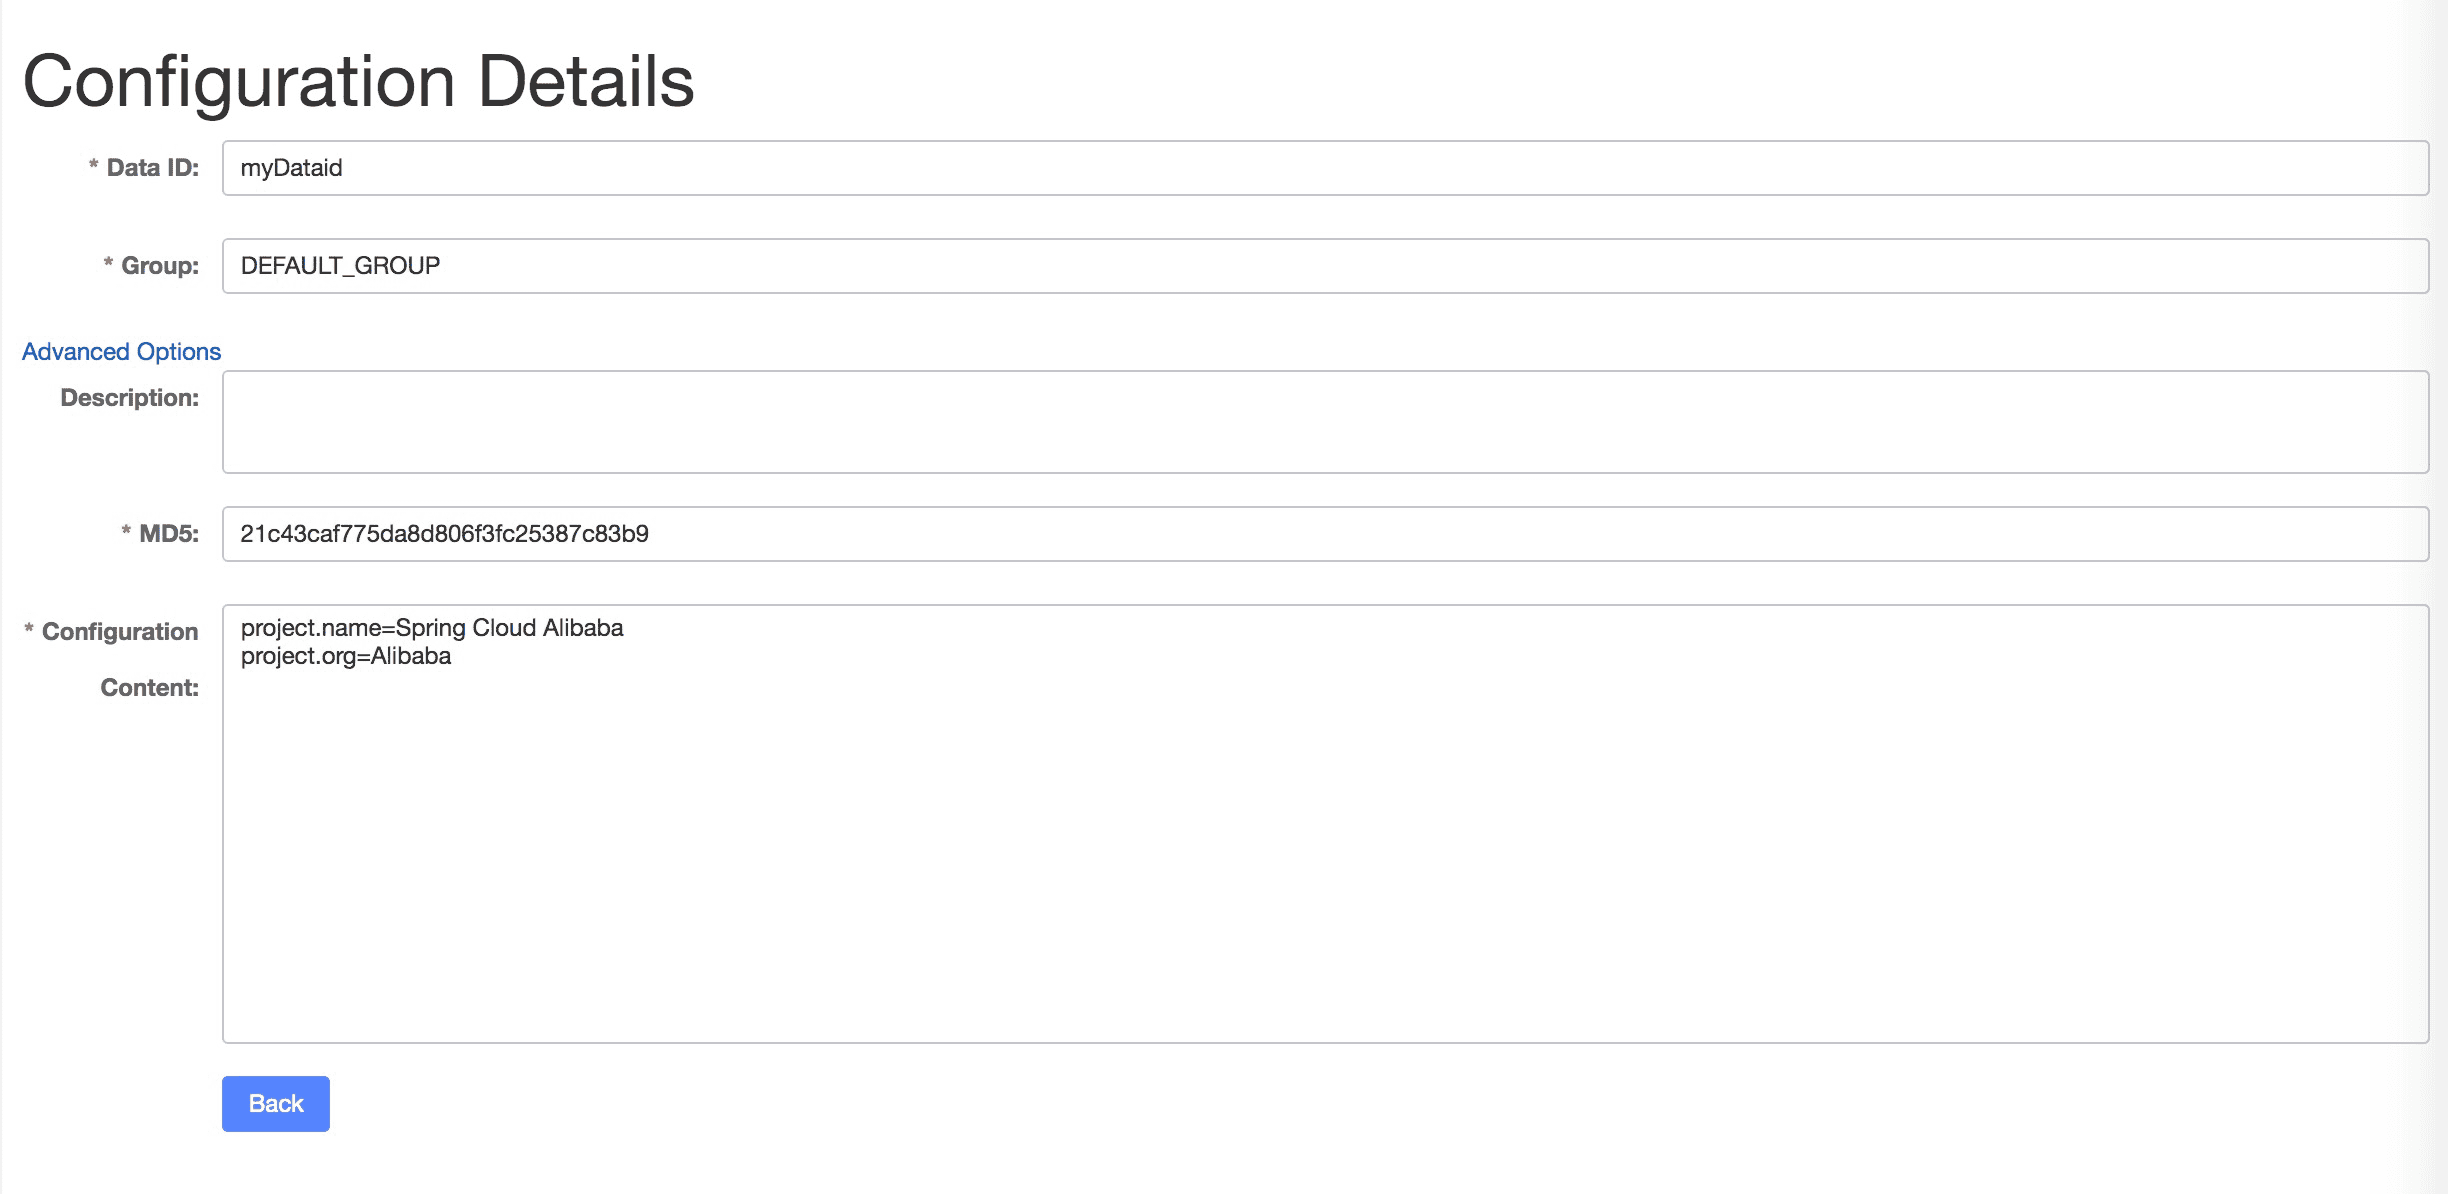
Nacos Config uses DataId and GROUP to determine a configuration.
The following figure shows that the DataId uses myDataid, GROUP uses DEFAULT_GROUP, and configures a configuration item of the format Properties:
4.2.1. Initialize Nacos Server
For specific startup methods, refer to the "Nacos Server Startup" section of the Spring Cloud Alibaba Nacos Discovery section.
After the Nacos Server is started, add how to configure it:
Data ID:    nacos-config.properties

Group  :    DEFAULT_GROUP

Configuration format:    Properties

Configuration content:   user.name=nacos-config-properties
user.age=90|
Note
|
The default file extension of DataId is properties. |
Usage on the Client
If you want to use Nacos to manage externalized configurations for your applications, please use the starter with the group ID as com.alibaba.cloud and the artifact ID as spring-cloud-starter-alibaba-nacos-config.
<dependency>
    <groupId>com.alibaba.cloud</groupId>
    <artifactId>spring-cloud-starter-alibaba-nacos-config</artifactId>
</dependency>
Now we can create a standard Spring Boot application.
@SpringBootApplication
public class NacosConfigApplication {

    public static void main(String[] args) {
        ConfigurableApplicationContext applicationContext = SpringApplication.run(NacosConfigApplication.class, args);
        String userName = applicationContext.getEnvironment().getProperty("user.name");
        String userAge = applicationContext.getEnvironment().getProperty("user.age");
        System.err.println("user name :" +userName+"; age: "+userAge);
    }
}|
Note
|
Note that when your |
<dependency>
    <groupId>org.springframework.cloud</groupId>
    <artifactId>spring-cloud-starter-bootstrap</artifactId>
    <version>3.1.1</version>
</dependency>
Before running this example, we need to configure the address of the Nacos server in bootstrap.properties. For example:
# DataId By default, the `spring.application.name` configuration is combined with the file extension (the configuration format uses properties by default), and the GROUP is not configured to use DEFAULT_GROUP by default. Therefore, the Nacos Config configuration corresponding to the configuration file has a DataId of nacos-config.properties and a GROUP of DEFAULT_GROUP
spring.application.name=nacos-config
spring.cloud.nacos.config.server-addr=127.0.0.1:8848|
Note
|
If you use domain name to access Nacos, the format of spring.cloud.nacos.config.server-addr should be Domain name:port.
For example, if the Nacos domain name is abc.com.nacos, and the listerner port is 80, then the configuration should be spring.cloud.nacos.config.server-addr=abc.com.nacos:80.
Port 80 cannot be omitted.
|
Run this example and you can see the following output:
2018-11-02 14:24:51.638  INFO 32700 --- [main] c.a.demo.provider.NacosConfigApplication    : Started NacosConfigApplication in 14.645 seconds (JVM running for 15.139)
user name :nacos-config-properties; age: 90
2018-11-02 14:24:51.688  INFO 32700 --- [-127.0.0.1:8848] s.c.a.AnnotationConfigApplicationContext : Refreshing org.springframework.context.annotation.AnnotationConfigApplicationContext@a8c5e74: startup date [Fri Nov 02 14:24:51 CST 2018]; root of context hierarchy
4.3. Add Configurations with DataId in YAML Format
Nacos Config supports yaml format as well. You only need to complete the following 2 steps.
1、In the bootstrap.properties file, add the following line to claim that the format of DataId is yaml. As follows:
spring.cloud.nacos.config.file-extension=yaml2、Add a configuration with the DataId in yaml format on the Nacos console, as shown below:
Data ID:        nacos-config.yaml

Group  :        DEFAULT_GROUP

Configuration format:        YAML

Configuration content:        user.name: nacos-config-yaml
                              user.age: 68
After completing the preivous two steps, restart the testing program and you will see the following result.
2018-11-02 14:59:00.484  INFO 32928 --- [main] c.a.demo.provider.NacosConfigApplication:Started NacosConfigApplication in 14.183 seconds (JVM running for 14.671)
user name :nacos-config-yaml; age: 68
2018-11-02 14:59:00.529  INFO 32928 --- [-127.0.0.1:8848] s.c.a.AnnotationConfigApplicationContext : Refreshing org.springframework.context.annotation.AnnotationConfigApplicationContext@265a478e: startup date [Fri Nov 02 14:59:00 CST 2018]; root of context hierarchy
4.4. Support Dynamic Configuration Udpates
Nacos Config also supports dynamic configuration updates. The code for starting Spring Boot application testing is as follows:
@SpringBootApplication
public class NacosConfigApplication {

    public static void main(String[] args) {
        ConfigurableApplicationContext applicationContext = SpringApplication.run(NacosConfigApplication.class, args);
        while(true) {
            //When configurations are refreshed dynamically, they will be updated in the Enviroment, therefore here we retrieve configurations from Environment every other second.
            String userName = applicationContext.getEnvironment().getProperty("user.name");
            String userAge = applicationContext.getEnvironment().getProperty("user.age");
            System.err.println("user name :" + userName + "; age: " + userAge);
            TimeUnit.SECONDS.sleep(1);
        }
    }
}
When user.name is changed, the latest value can be retrieved from the application, as shown below:
user name :nacos-config-yaml; age: 68
user name :nacos-config-yaml; age: 68
user name :nacos-config-yaml; age: 68
2018-11-02 15:04:25.069  INFO 32957 --- [-127.0.0.1:8848] o.s.boot.SpringApplication               : Started application in 0.144 seconds (JVM running for 71.752)
2018-11-02 15:04:25.070  INFO 32957 --- [-127.0.0.1:8848] s.c.a.AnnotationConfigApplicationContext : Closing org.springframework.context.annotation.AnnotationConfigApplicationContext@10c89124: startup date [Fri Nov 02 15:04:25 CST 2018]; parent: org.springframework.context.annotation.AnnotationConfigApplicationContext@6520af7
2018-11-02 15:04:25.071  INFO 32957 --- [-127.0.0.1:8848] s.c.a.AnnotationConfigApplicationContext : Closing org.springframework.context.annotation.AnnotationConfigApplicationContext@6520af7: startup date [Fri Nov 02 15:04:24 CST 2018]; root of context hierarchy
//Read the updated value from Enviroment
user name :nacos-config-yaml-update; age: 68
user name :nacos-config-yaml-update; age: 68|
Note
|
You can disable automatic refresh with this setting`spring.cloud.nacos.config.refresh.enabled=false`. |
4.5. Support configurations at the profile level
When configurations are loaded by Nacos Config, basic configurations with DataId of ${spring.application.name}. ${file-extension:properties} , and DataId of ${spring.application.name}-${profile}. ${file-extension:properties} are also loaded. If you need to use different configurations from different environments, you can use the ${spring.profiles.active} configuration provided by Spring.
spring.profiles.active=develop|
Note
|
When specified in configuration files, ${spring.profiles.active} must be placed in bootstrap.properties. |
Add a basic configuration in Nacos, with a DataId of nacos-config-develop.yaml, as shown below:
Data ID:        nacos-config-develop.yaml

Group  :        DEFAULT_GROUP

Configuration format:        YAML

Configuration content:        current.env: develop-env
Run the following Spring Boot application testing code:
@SpringBootApplication
public class NacosConfigApplication {

    public static void main(String[] args) {
        ConfigurableApplicationContext applicationContext = SpringApplication.run(NacosConfigApplication.class, args);
        while(true) {
            String userName = applicationContext.getEnvironment().getProperty("user.name");
            String userAge = applicationContext.getEnvironment().getProperty("user.age");
            //Get the current deployment environment
            String currentEnv = applicationContext.getEnvironment().getProperty("current.env");
            System.err.println("in "+currentEnv+" enviroment; "+"user name :" + userName + "; age: " + userAge);
            TimeUnit.SECONDS.sleep(1);
        }
    }
}
After started, you can see the output as follows in the console:
in develop-env enviroment; user name :nacos-config-yaml-update; age: 68
2018-11-02 15:34:25.013  INFO 33014 --- [ Thread-11] ConfigServletWebServerApplicationContext : Closing org.springframework.boot.web.servlet.context.AnnotationConfigServletWebServerApplicationContext@6f1c29b7: startup date [Fri Nov 02 15:33:57 CST 2018]; parent: org.springframework.context.annotation.AnnotationConfigApplicationContext@63355449
To switch to the production environment, you only need to change the parameter of ${spring.profiles.active}. As show below:
spring.profiles.active=productAt the same time, add the basic configuration with the DataId in the Nacos of your production environment. For example, you can add the configuration with the DataId of nacos-config-product.yaml in Nacos of your production environment:
Data ID:        nacos-config-product.yaml

Group  :        DEFAULT_GROUP

Configuration format:        YAML

Configuration content:        current.env: product-env
Start the testing program and you will see the following result:
in product-env enviroment; user name :nacos-config-yaml-update; age: 68
2018-11-02 15:42:14.628 INFO 33024 --- [Thread-11] ConfigServletWebServerApplicationContext : Closing org.springframework.boot.web.servlet.context.AnnotationConfigServletWebServerApplicationContext@6aa8e115: startup date [Fri Nov 02 15:42:03 CST 2018]; parent: org.springframework.context.annotation.AnnotationConfigApplicationContext@19bb07ed|
Note
|
In this example, we coded the configuration in the configuration file by using the spring.profiles.active=<profilename> method. In real scenarios, this variable needs to be different in different environment. You can use the -Dspring.profiles.active=<profile> parameter to specify the configuration so that you can switch between different environments easily.
|
4.6. Support Custom Namespaces
For details about namespaces in Nacos, refer to Nacos Concepts
Namespaces are used to isolate configurations for different tenants. Groups and Data IDs can be the same across different namespaces. Typical scenarios of namespaces is the isolation of configurations for different environments, for example, isolation between development/testing environments and production environments(configurations and services and so on).
The “Public” namespace of Nacos is used if no namespace is specified in ${spring.cloud.nacos.config.namespace}. You can also specify a custom namespace in the following way:
spring.cloud.nacos.config.namespace=b3404bc0-d7dc-4855-b519-570ed34b62d7|
Note
|
This configuration must be in the bootstrap.properties file. The value of spring.cloud.nacos.config.namespace is the id of the namespace, and the value of id can be retrieved from the Nacos console. Do not select other namespaces when adding configurations. Otherwise configurations cannot be retrieved properly.
|
4.7. Support Custom Groups
DEFAULT_GROUP is used by default when no {spring.cloud.nacos.config.group} configuration is defined. If you need to define your own group, you can define it in the following property:
spring.cloud.nacos.config.group=DEVELOP_GROUP|
Note
|
This configuration must be in the bootstrap.properties file, and the value of Group must be the same with the value of spring.cloud.nacos.config.group.
|
4.8. Support Custom Data Id
As of Spring Cloud Alibaba Nacos Config, data id can be self-defined. For detailed design of this part, refer to Github issue. The following is a complete sample:
spring.application.name=opensource-service-provider
spring.cloud.nacos.config.server-addr=127.0.0.1:8848

# config external configuration
# 1. Data Id is in the default group of DEFAULT_GROUP, and dynamic refresh of configurations is not supported.
spring.cloud.nacos.config.ext-config[0].data-id=ext-config-common01.properties

# 2. Data Id is not in the default group, and dynamic refresh of configurations is not supported.
spring.cloud.nacos.config.ext-config[1].data-id=ext-config-common02.properties
spring.cloud.nacos.config.ext-config[1].group=GLOBALE_GROUP

# 3. Data Id is not in the default group and dynamic referesh of configurations is supported.
spring.cloud.nacos.config.ext-config[2].data-id=ext-config-common03.properties
spring.cloud.nacos.config.ext-config[2].group=REFRESH_GROUP
spring.cloud.nacos.config.ext-config[2].refresh=true
We can see that:
-
Support multiple data ids by configuring
spring.cloud.nacos.config.ext-config[n].data-id. -
Customize the group of data id by configuring
spring.cloud.nacos.config.ext-config[n].group. If not specified, DEFAULT_GROUP is used. -
Control whether this data id supports dynamic refresh of configurations is supported when configurations are changed by configuring
spring.cloud.nacos.config.ext-config[n].refresh. It’s not supported by default.
|
Note
|
When multiple Data Ids are configured at the same time, the priority is defined by the value of “n” in spring.cloud.nacos.config.ext-config[n].data-id. The bigger the value, the higher the priority.
|
|
Note
|
The value of spring.cloud.nacos.config.ext-config[n].data-id must have a file extension, and it could be properties or yaml/yml.
The setting in spring.cloud.nacos.config.file-extension does not have any impact on the custom Data Id file extension.
|
The configuration of custom Data Id allows the sharing of configurations among multiple applications, and also enables support of multiple configurations for one application.
To share the data id among multiple applications in a clearer manner, you can also use the following method:
spring.cloud.nacos.config.shared-dataids=bootstrap-common.properties,all-common.properties
spring.cloud.nacos.config.refreshable-dataids=bootstrap-common.properties
We can see that:
-
Multiple shared data ids can be configured using
spring.cloud.nacos.config.shared-dataids, and the data ids are separted by commas. -
spring.cloud.nacos.config.refreshable-dataidsis used to control which data ids will be refreshed dynamically when configurations are updated, and that the latest configuration values can be retrieved by applications. Data ids are separated with commas. If not specified, all shared data ids will not be dynamically refreshed.
|
Note
|
When using spring.cloud.nacos.config.shared-dataids to configure multiple shared data ids,
we agree on the following priority between the shared configurations: Priorities are decided based on the order in which the configurations appear. The one that occurs later is higher in priority than the one that appears first.
|
|
Note
|
When using spring.cloud.nacos.config.shared-dataids, the data Id must have a file extension, and it could be properties or yaml/yml.
And the configuration in spring.cloud.nacos.config.file-extension does not have any impact on the customized Data Id file extension.
|
|
Note
|
When spring.cloud.nacos.config.refreshable-dataids specifies the data ids that support dynamic refresh, the corresponding values of the data ids should also specify file extensions.
|
4.9. Nacos Config Endpoint
Nacos Config provides an Endpoint internally with a corresponding endpoint id of nacos-config.
Endpoint exposed json contains three properties:
-
Sources: Current application configuration data information
-
RefreshHistory: Configuration refresh history
-
NacosConfigProperties: Shows the current basic Nacos configurations of the current service
The followings shows how a service instance accesses the Endpoint:
{
	"NacosConfigProperties": {
		"serverAddr": "127.0.0.1:8848",
		"encode": null,
		"group": "DEFAULT_GROUP",
		"prefix": null,
		"fileExtension": "properties",
		"timeout": 3000,
		"endpoint": null,
		"namespace": null,
		"accessKey": null,
		"secretKey": null,
		"contextPath": null,
		"clusterName": null,
		"name": null,
		"sharedDataids": "base-common.properties,common.properties",
		"refreshableDataids": "common.properties",
		"extConfig": null
	},
	"RefreshHistory": [{
		"timestamp": "2019-07-29 11:20:04",
		"dataId": "nacos-config-example.properties",
		"md5": "7d5d7f1051ff6571e2ec9f90887d9d91"
	}],
	"Sources": [{
		"lastSynced": "2019-07-29 11:19:04",
		"dataId": "common.properties"
	}, {
		"lastSynced": "2019-07-29 11:19:04",
		"dataId": "base-common.properties"
	}, {
		"lastSynced": "2019-07-29 11:19:04",
		"dataId": "nacos-config-example.properties"
	}]
}
4.10. Disable Nacos Config AutoConfiguration
set spring.cloud.nacos.config.enabled = false to disable Spring Cloud Nacos Config AutoConfiguration.
4.11. More Information about Nacos Config Starter Configurations
The following shows the other configurations of the starter of Nacos Config:
Configuration |
Key |
Default Value |
Description |
Server address |
|
IP and port of the Nacos Server listener |
|
Dataid from nacos config |
|
First take the prefix, then go to the name, and finally take spring.application.name |
|
Dataid from nacos config |
|
First take the prefix, then go to the name, and finally take spring.application.name |
|
Encode for nacos config content |
|
Encode for nacos config content |
|
GROUP for nacos config |
|
|
GROUP for nacos config |
The suffix of nacos config dataId, also the file extension of config content. |
|
|
The suffix of nacos config dataId, also the file extension of config content(now support properties or yaml(yml)) |
Timeout for get config from nacos |
|
|
Timeout for get config from nacos |
Endpoint |
|
Endpoint |
|
Namespace |
|
Namespace |
|
AccessKey |
|
Alibaba Cloud account accesskey |
|
SecretKey |
|
Alibaba Cloud account secretkey |
|
The context path of Nacos Server |
|
The context path of Nacos Server |
|
Cluster name |
|
Cluster name |
|
Dataid for Shared Configuration |
|
Dataid for Shared Configuration, split by "," |
|
Dynamic refresh dataid for Shared Configuration |
|
Dynamic refresh dataid for Shared Configuration, split by "," |
|
custom dataid |
|
It’s a List,build up by |
5. Spring Cloud Alibaba Sentinel
5.1. Introduction of Sentinel
As microservices become popular, the stability of service calls is becoming increasingly important. Sentinel takes "flow" as the breakthrough point, and works on multiple fields including flow control, circuit breaking and load protection to protect service reliability.
Sentinel has the following features:
-
Rich Scenarios: Sentinel has supported the key scenarios of Alibaba’s Double 11 Shopping Festivals for over 10 years, such as second kill(i.e., controlling sudden bursts of traffic flow so that it’s within the acceptable range of the system capacity), message load shifting, circuit breaking of unreliable downstream applications.
-
Comprehensive Real-Time Monitoring: Sentinel provides real-time monitoring capability. You can see the monitoring data of your servers at the accuracy of seconds, and even the overall runtime status of a cluster with less than 500 nodes.
-
Extensive Open-Source Ecosystem: Sentinel provides out-of-box modules that can be easily integrated with other open-source frameworks/libraries, such as Spring Cloud, Dubbo, and gRPC. To use Sentinel, you only need to introduce the related dependency and make a few simple configurations.
-
Sound SPI Extensions: Sentinel provides easy-to-use and sound SPI extension interfaces. You can customize logics with the SPI extensions quickly, for example, you can define your own rule management, or adapt to specific data sources.
5.2. How to Use Sentinel
If you want to use Sentinel in your project, please use the starter with the group ID as com.alibaba.cloud and the artifact ID as spring-cloud-starter-alibaba-sentinel.
<dependency>
    <groupId>com.alibaba.cloud</groupId>
    <artifactId>spring-cloud-starter-alibaba-sentinel</artifactId>
</dependency>
The following is a simple example of how to use Sentinel:
@SpringBootApplication
public class Application {

    public static void main(String[] args) {
        SpringApplication.run(ServiceApplication.class, args);
    }

}

@RestController
public class TestController {

    @GetMapping(value = "/hello")
    @SentinelResource("hello")
    public String hello() {
        return "Hello Sentinel";
    }

}
The @SentinelResource annotation is used to identify if a resource is rate limited or degraded. In the above sample, the 'hello' attribute of the annotation refers to the resource name.
@SentinelResource also provides attributes such as blockHandler, blockHandlerClass, and fallback to identify rate limiting or degradation operations. For more details, refer to Sentinel Annotation Support.
The above examples are all used in the WebServlet environment. Sentinel currently supports WebFlux and needs to cooperate with the spring-boot-starter-webflux dependency to trigger the WebFlux-related automation configuration in sentinel starter.
@SpringBootApplication
public class Application {
public static void main(String[] args) {
SpringApplication.run(ServiceApplication.class, args);
}
}
@RestController
public class TestController {
@GetMapping("/mono")
@SentinelResource("hello")
public Mono<String> mono() {
return Mono.just("simple string")
.transform(new SentinelReactorTransformer<>("otherResourceName"));
}
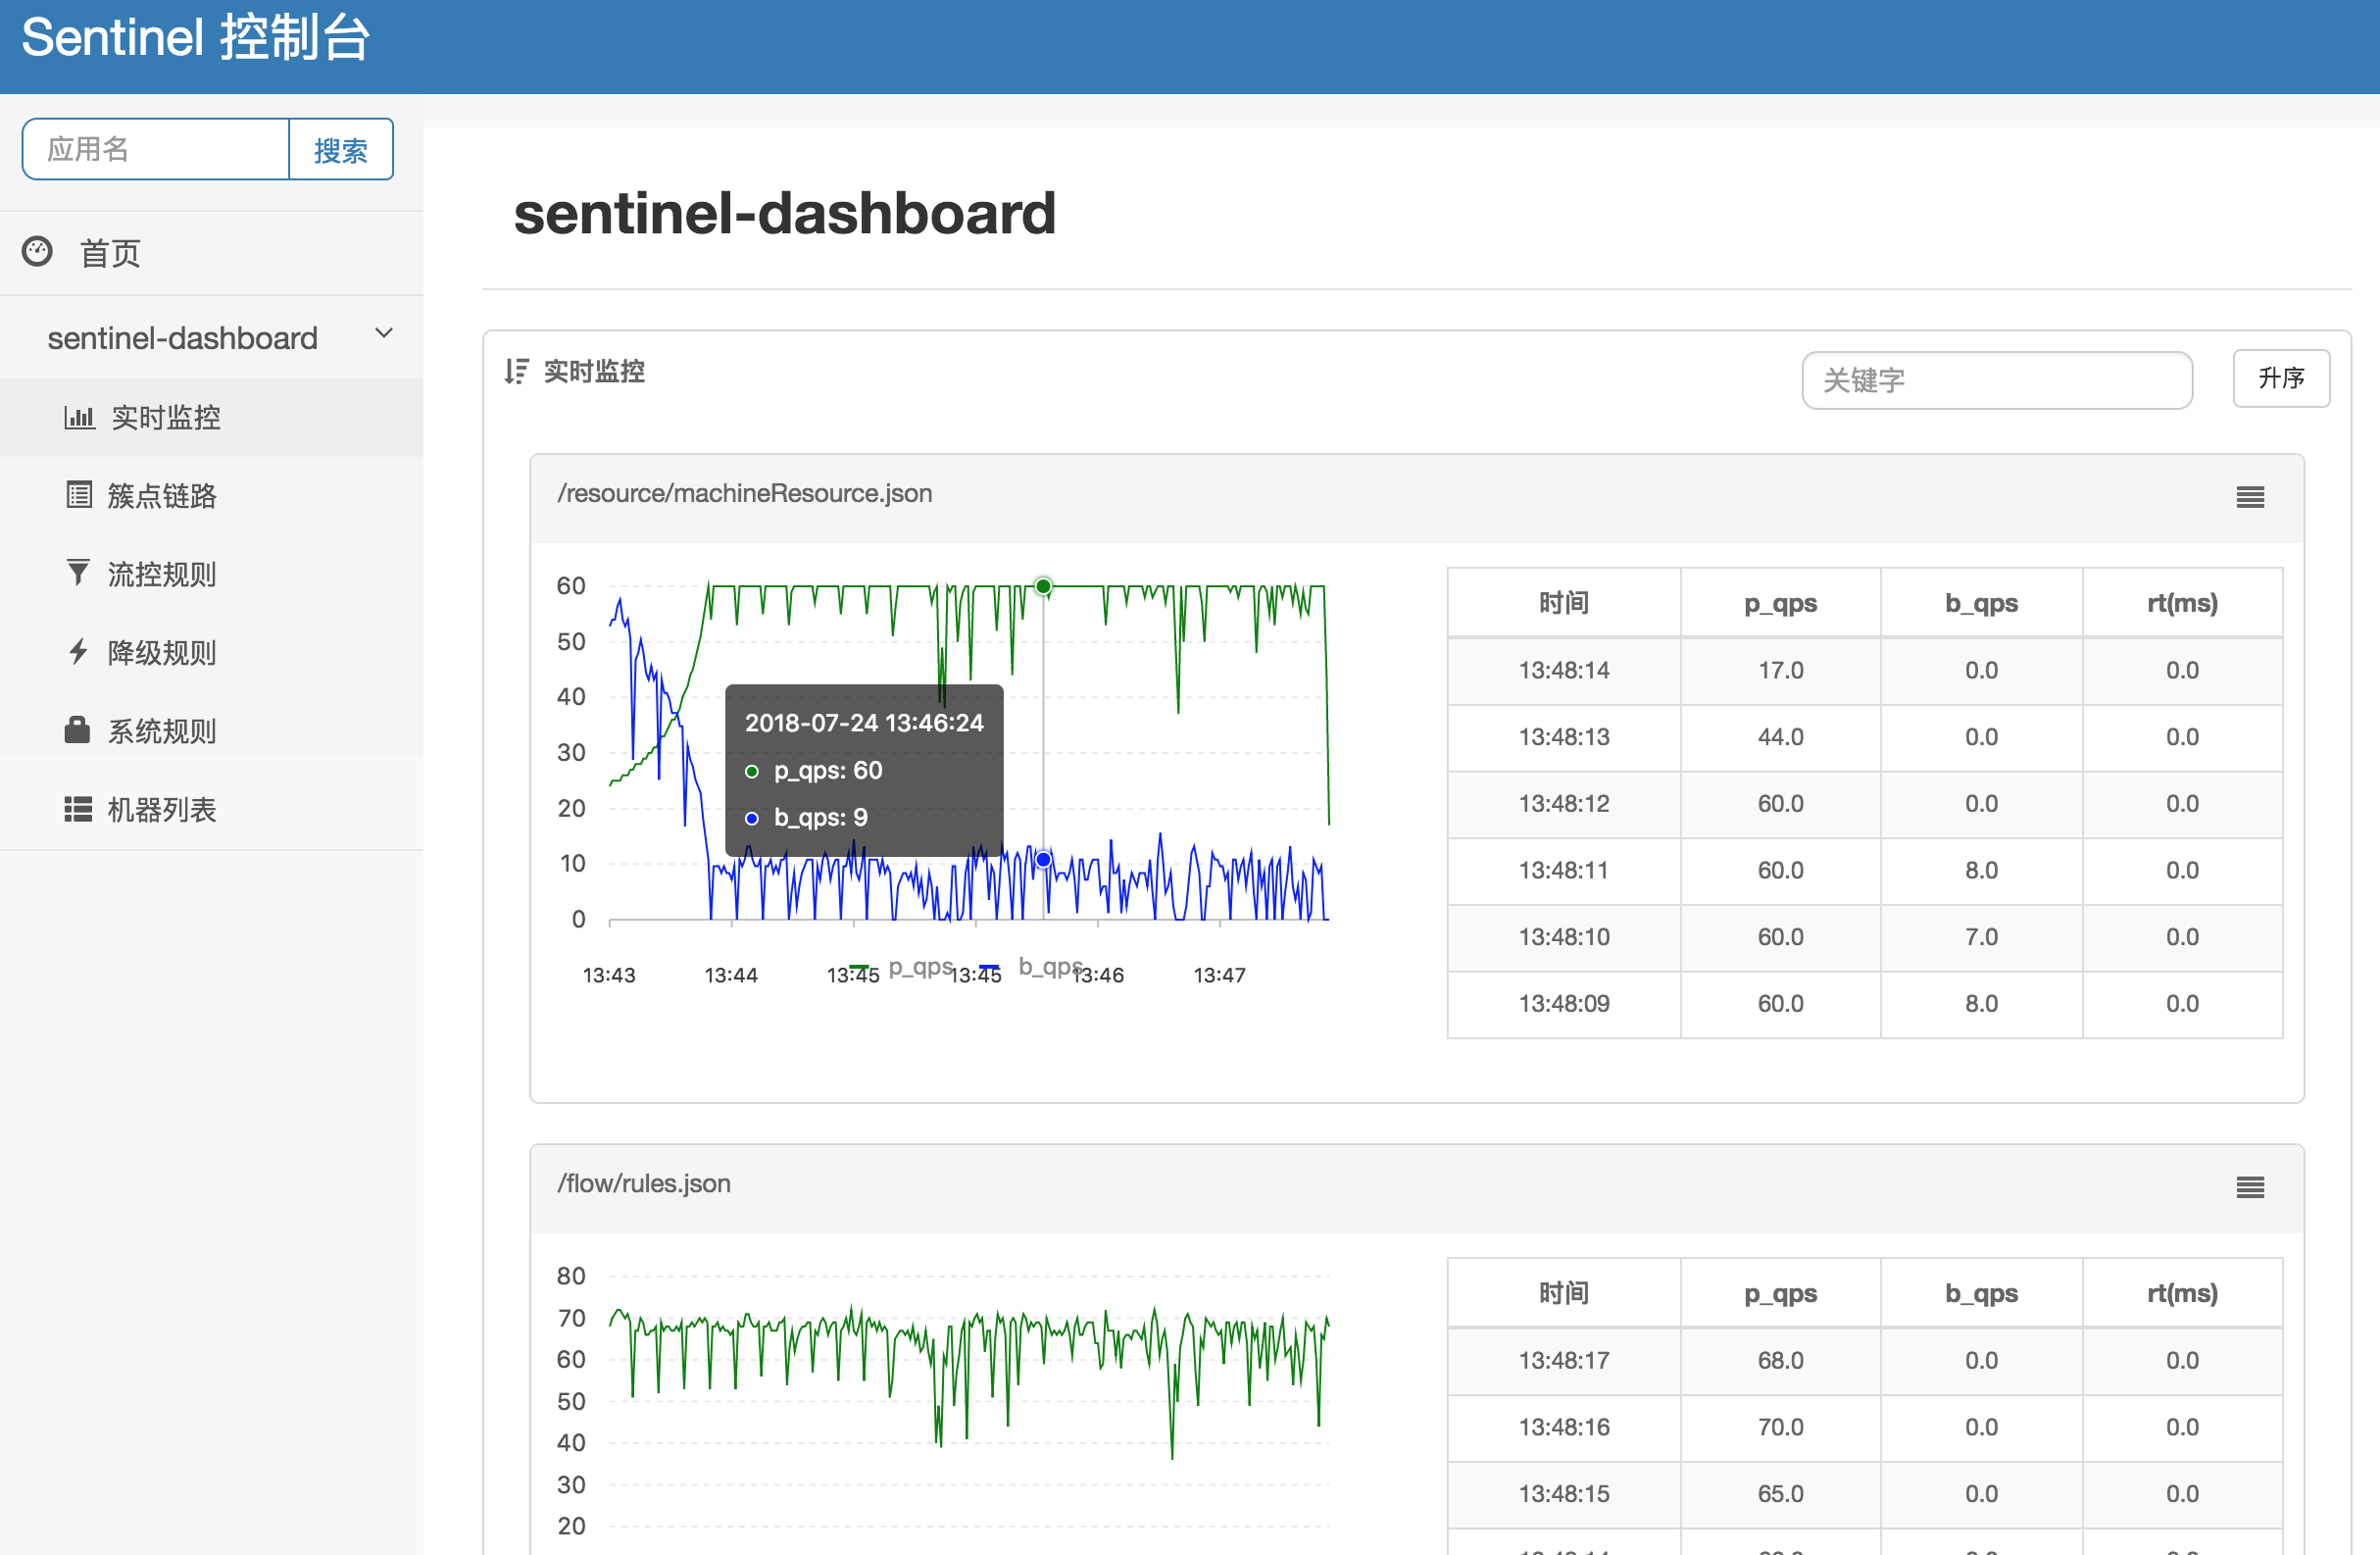
}Sentinel Dashboard
Sentinel dashboard is a lightweight console that provides functions such as machine discovery, single-server resource monitoring, overview of cluster resource data, as well as rule management. To use these features, you only need to complete a few steps.
Note: The statistics overview for clusters only supports clusters with less than 500 nodes, and has a latency of about 1 to 2 seconds.
To use the Sentinel dashboard, simply complete the following 3 steps.
Get the Dashboard
You can download the latest dashboard JAR file from the Release Page.
You can also get the latest source code to build your own Sentinel dashboard:
-
Download the Dashboard project.
-
Run the following command to package the code into a FatJar:
mvn clean package
Start the Dashboard
Sentinel dashboard is a standard SpringBoot application, and you can run the JAR file in the Spring Boot mode.
java -Dserver.port=8080 -Dcsp.sentinel.dashboard.server=localhost:8080 -Dproject.name=sentinel-dashboard -jar sentinel-dashboard.jarIf there is conflict with the 8080 port, you can use -Dserver.port=new port to define a new port.
5.2.2. Configure the Dashboard
spring:
  cloud:
    sentinel:
      transport:
        port: 8719
        dashboard: localhost:8080
The port number specified in spring.cloud.sentinel.transport.port will start an HTTP Server on the corresponding server of the application, and this server will interact with the Sentinel dashboard. For example, if a rate limiting rule is added in the Sentinel dashboard, the the rule data will be pushed to and recieved by the HTTP Server, which in turn registers the rule to Sentinel.
For more information about Sentinel dashboard, please refer to Sentinel Dashboard.
5.3. OpenFeign Support
Sentinel is compatible with the OpenFeign component. To use it, in addition to introducing the sentinel-starter dependency, complete the following 2 steps:
-
Enable the Sentinel support for feign in the properties file.
feign.sentinel.enabled=true -
Add the
openfeign starterdependency to trigger and enablesentinel starter:
<dependency>
    <groupId>org.springframework.cloud</groupId>
    <artifactId>spring-cloud-starter-openfeign</artifactId>
</dependency>
This is a simple usage of FeignClient:
@FeignClient(name = "service-provider", fallback = EchoServiceFallback.class, configuration = FeignConfiguration.class)
public interface EchoService {
    @GetMapping(value = "/echo/{str}")
    String echo(@PathVariable("str") String str);
}

class FeignConfiguration {
    @Bean
    public EchoServiceFallback echoServiceFallback() {
        return new EchoServiceFallback();
    }
}

class EchoServiceFallback implements EchoService {
    @Override
    public String echo(@PathVariable("str") String str) {
        return "echo fallback";
    }
}|
Note
|
The resource name policy in the corresponding interface of Feign is:httpmethod:protocol://requesturl. All the attributes in the @FeignClient annotation is supported by Sentinel.
|
The corresponding resource name of the echo method in the EchoService interface is GET:http://service-provider/echo/{str}.
5.4. RestTemplate Support
Spring Cloud Alibaba Sentinel supports the protection of RestTemplate service calls using Sentinel. To do this, you need to add the @SentinelRestTemplate annotation when constructing the RestTemplate bean.
@Bean
@SentinelRestTemplate(blockHandler = "handleException", blockHandlerClass = ExceptionUtil.class)
public RestTemplate restTemplate() {
    return new RestTemplate();
}
The attribute of the @SentinelRestTemplate annotation support flow control(blockHandler, blockHandlerClass) and circuit breaking(fallback, fallbackClass).
==
The blockHandler or fallback is the static method of blockHandlerClass or fallbackClass.
The parameter and return value of method in @SentinelRestTemplate is same as org.springframework.http.client.ClientHttpRequestInterceptor#interceptor, but it has one more parameter BlockException to catch the exception by Sentinel.
The method signature of handleException in ExceptionUtil above should be like this:
public class ExceptionUtil {
    public static ClientHttpResponse handleException(HttpRequest request, byte[] body, ClientHttpRequestExecution execution, BlockException exception) {
        ...
    }
}|
Note
|
When the application starts, it will check if the @SentinelRestTemplate annotation corresponding to the flow control or circuit breaking method exists, if it does not exist, it will throw an exception.
|
The attribute of the @SentinelRestTemplate annotation is optional.
It will return RestTemplate request block by sentinel when you using RestTemplate blocked by Sentinel. You can override it by your own logic. We provide SentinelClientHttpResponse to handle the response.
Sentinel RestTemplate provides two granularities for resource rate limiting:
-
httpmethod:schema://host:port/path: Protocol, host, port and path -
httpmethod:schema://host:port: Protocol, host and port
|
Note
|
Take Http GET https://www.taobao.com/test as an example. The corresponding resource names have two levels of granularities, GET:https://www.taobao.com and GET:https://www.taobao.com/test.
|
5.5. Dynamic Data Source Support
SentinelProperties provide datasource attribute to configure datasource.
For example, 4 data sources are configures:
spring.cloud.sentinel.datasource.ds1.file.file=classpath: degraderule.json
spring.cloud.sentinel.datasource.ds1.file.rule-type=flow

#spring.cloud.sentinel.datasource.ds1.file.file=classpath: flowrule.json
#spring.cloud.sentinel.datasource.ds1.file.data-type=custom
#spring.cloud.sentinel.datasource.ds1.file.converter-class=JsonFlowRuleListConverter
#spring.cloud.sentinel.datasource.ds1.file.rule-type=flow

spring.cloud.sentinel.datasource.ds2.nacos.server-addr=127.0.0.1:8848
spring.cloud.sentinel.datasource.ds2.nacos.data-id=sentinel
spring.cloud.sentinel.datasource.ds2.nacos.group-id=DEFAULT_GROUP
spring.cloud.sentinel.datasource.ds2.nacos.data-type=json
spring.cloud.sentinel.datasource.ds2.nacos.rule-type=degrade

spring.cloud.sentinel.datasource.ds3.zk.path = /Sentinel-Demo/SYSTEM-CODE-DEMO-FLOW
spring.cloud.sentinel.datasource.ds3.zk.server-addr = localhost:2181
spring.cloud.sentinel.datasource.ds3.zk.rule-type=authority

spring.cloud.sentinel.datasource.ds4.apollo.namespace-name = application
spring.cloud.sentinel.datasource.ds4.apollo.flow-rules-key = sentinel
spring.cloud.sentinel.datasource.ds4.apollo.default-flow-rule-value = test
spring.cloud.sentinel.datasource.ds4.apollo.rule-type=param-flow
This method follows the configuration of Spring Cloud Stream Binder. TreeMap is used for storage internally, and comparator is String.CASE_INSENSITIVE_ORDER.
|
Note
|
d1, ds2, ds3, ds4 are the names of ReadableDataSource, and can be coded as you like. The file, zk, nacos , apollo refer to the specific data sources. The configurations following them are the specific configurations of these data sources respecitively.
|
Every data source has 3 common configuration items: data-type, converter-class and rule-type.
data-type refers to Converter. Spring Cloud Alibaba Sentinel provides two embedded values by default: json and xml (the default is json if not specified). If you do not want to use the embedded json or xml Converter, you can also fill in custom to indicate that you will define your own Converter, and then configure the converter-class. You need to specify the full path of the class for this configuration.
rule-type refers to the rule type in datasource(flow,degrade,authority,system, param-flow, gw-flow, gw-api-group).
|
Note
|
XML format is not supported by default. To make it effective, you need to add the jackson-dataformat-xml dependency.
|
To learn more about how dynamic data sources work in Sentinel, refer to Dynamic Rule Extension.
5.6. Support Spring Cloud Gateway
Refer API Gateway Flow Control
If you want to use Sentinel Starter with Spring Cloud Gateway, you need to add the spring-cloud-alibaba-sentinel-gateway dependency and add the spring-cloud-starter-gateway dependency to let Spring Cloud Gateway AutoConfiguration class in the module takes effect:
<dependency>
    <groupId>com.alibaba.cloud</groupId>
    <artifactId>spring-cloud-starter-alibaba-sentinel</artifactId>
</dependency>

<dependency>
    <groupId>com.alibaba.cloud</groupId>
    <artifactId>spring-cloud-alibaba-sentinel-gateway</artifactId>
</dependency>

<dependency>
    <groupId>org.springframework.cloud</groupId>
    <artifactId>spring-cloud-starter-gateway</artifactId>
</dependency>
5.7. Circuit Breaker: Spring Cloud Circuit Breaker With Sentinel & Configuring Sentinel Circuit Breakers
5.7.1. Default Configuration
To provide a default configuration for all of your circuit breakers create a Customizer bean that is passed a
SentinelCircuitBreakerFactory or ReactiveSentinelCircuitBreakerFactory.
The configureDefault method can be used to provide a default configuration.
@Bean
public Customizer<SentinelCircuitBreakerFactory> defaultCustomizer() {
	return factory -> factory.configureDefault(id -> new SentinelConfigBuilder(id)
			.build());
}
You can choose to provide default circuit breaking rules via SentinelConfigBuilder#rules(rules).
You can also choose to load circuit breaking rules later elsewhere using
DegradeRuleManager.loadRules(rules) API of Sentinel, or via Sentinel dashboard.
Reactive Example
@Bean
public Customizer<ReactiveSentinelCircuitBreakerFactory> defaultCustomizer() {
	return factory -> factory.configureDefault(id -> new SentinelConfigBuilder(id)
			.build());
}
5.7.2. Specific Circuit Breaker Configuration
Similarly to providing a default configuration, you can create a Customizer bean this is passed a
SentinelCircuitBreakerFactory.
@Bean
public Customizer<SentinelCircuitBreakerFactory> slowCustomizer() {
	String slowId = "slow";
	List<DegradeRule> rules = Collections.singletonList(
		new DegradeRule(slowId).setGrade(RuleConstant.DEGRADE_GRADE_RT)
			.setCount(100)
			.setTimeWindow(10)
		);
	return factory -> factory.configure(builder -> builder.rules(rules), slowId);
}
Reactive Example
@Bean
public Customizer<ReactiveSentinelCircuitBreakerFactory> customizer() {
	List<DegradeRule> rules = Collections.singletonList(
		new DegradeRule().setGrade(RuleConstant.DEGRADE_GRADE_RT)
			.setCount(100)
			.setTimeWindow(10)
		);
	return factory -> factory.configure(builder -> builder.rules(rules), "foo", "bar");
}
5.8. Sentinel Endpoint
Sentinel provides an Endpoint internally with a corresponding endpoint id of sentinel.
Endpoint exposed json contains multi properties:
-
appName: application name
-
logDir: the directory of log
-
logUsePid: log name with pid ot not
-
blockPage: redirect page after sentinel block
-
metricsFileSize: the size of metrics file
-
metricsFileCharset: metrics file charset
-
totalMetricsFileCount: the total file count of of metrics file
-
consoleServer: sentinel dashboard address
-
clientIp: client ip
-
heartbeatIntervalMs: client heartbeat interval with dashboard
-
clientPort: the client needs to expose the port to interact with the dashboard
-
coldFactor: cold factor
-
filter: CommonFilter related properties, such as order, urlPatterns and enable
-
datasource: datasource configuration info by client
-
rules: the rule that the client takes effect internally contains flowRules, degradeRules, systemRules, authorityRule, paramFlowRule
The followings shows how a service instance accesses the Endpoint:
{
	"blockPage": null,
	"appName": "sentinel-example",
	"consoleServer": "localhost:8080",
	"coldFactor": "3",
	"rules": {
		"flowRules": [{
			"resource": "GET:http://www.taobao.com",
			"limitApp": "default",
			"grade": 1,
			"count": 0.0,
			"strategy": 0,
			"refResource": null,
			"controlBehavior": 0,
			"warmUpPeriodSec": 10,
			"maxQueueingTimeMs": 500,
			"clusterMode": false,
			"clusterConfig": null
		}, {
			"resource": "/test",
			"limitApp": "default",
			"grade": 1,
			"count": 0.0,
			"strategy": 0,
			"refResource": null,
			"controlBehavior": 0,
			"warmUpPeriodSec": 10,
			"maxQueueingTimeMs": 500,
			"clusterMode": false,
			"clusterConfig": null
		}, {
			"resource": "/hello",
			"limitApp": "default",
			"grade": 1,
			"count": 1.0,
			"strategy": 0,
			"refResource": null,
			"controlBehavior": 0,
			"warmUpPeriodSec": 10,
			"maxQueueingTimeMs": 500,
			"clusterMode": false,
			"clusterConfig": null
		}]
	},
	"metricsFileCharset": "UTF-8",
	"filter": {
		"order": -2147483648,
		"urlPatterns": ["/*"],
		"enabled": true
	},
	"totalMetricsFileCount": 6,
	"datasource": {
		"ds1": {
			"file": {
				"dataType": "json",
				"ruleType": "FLOW",
				"converterClass": null,
				"file": "...",
				"charset": "utf-8",
				"recommendRefreshMs": 3000,
				"bufSize": 1048576
			},
			"nacos": null,
			"zk": null,
			"apollo": null,
			"redis": null
		}
	},
	"clientIp": "30.5.121.91",
	"clientPort": "8719",
	"logUsePid": false,
	"metricsFileSize": 52428800,
	"logDir": "...",
	"heartbeatIntervalMs": 10000
}
5.9. Configuration
The following table shows that when there are corresponding bean types in ApplicationContext, some actions will be taken:
Existing Bean Type |
Action |
Function |
|
|
Resource cleaning(resource(for example, classify all URLs of /foo/:id to the /foo/* resource)) |
|
|
Customize rate limiting logic |
|
|
Setting the origin |
The following table shows all the configurations of Spring Cloud Alibaba Sentinel:
Configuration |
Description |
Default Value |
|
Project Name Of Sentinel |
|
|
Whether Sentinel automatic configuration takes effect |
true |
|
Whether to trigger Sentinel initialization in advance |
false |
|
Port for the application to interact with Sentinel dashboard. An HTTP Server which uses this port will be started in the application |
8719 |
|
Sentinel dashboard address |
|
|
Hearbeat interval between the application and Sentinel dashboard |
|
|
The client IP of this configuration will be registered to the Sentinel Server side. |
|
|
Loading order of Servlet Filter. The filter will be constructed in the Starter |
Integer.MIN_VALUE |
|
Data type is array. Refers to the collection of Servlet Filter ULR patterns |
/* |
|
Enable to instance CommonFilter |
true |
|
metric file character set |
UTF-8 |
|
Sentinel metric single file size |
|
|
Sentinel metric total file number |
|
|
Directory of Sentinel log files |
|
|
If PID is required for Sentinel log file names |
false |
|
Customized redirection URL. When rate limited, the request will be redirected to the pre-defined URL |
|
|
3 |
|
|
Response mode after Spring Cloud Gateway circuit break (select |
|
|
Spring Cloud Gateway response mode is the redirect URL corresponding to 'redirect' mode |
|
|
Spring Cloud Gateway response mode is response content corresponding to 'response' mode |
|
|
Spring Cloud Gateway response mode is the response code corresponding to 'response' mode |
429 |
|
The Spring Cloud Gateway response mode is the content-type corresponding to the 'response' mode. |
application/json |
|
Note
|
These configurations will only take effect in servlet environment. RestTemplate and Feign will not take effect for these configurations. |
6. Spring Cloud Alibaba RocketMQ Binder
6.1. Introduction of RocketMQ
RocketMQ is an open-source distributed message system. It is based on highly available distributed cluster technologies and provides message publishing and subscription service with low latency and high stability. RocketMQ is widely used in a variety of industries, such as decoupling of asynchronous communication, enterprise solutions, financial settlements, telecommunication, e-commerce, logistics, marketing, social media, instant messaging, mobile applications, mobile games, videos, IoT, and Internet of Vehicles.
It has the following features:
-
Strict order of message sending and consumption
-
Rich modes of message pulling
-
Horizontal scalability of consumers
-
Real-time message subscription
-
Billion-level message accumulation capability
6.2. RocketMQ Usages
-
Download RocketMQ
Download Latest Binary File of RocketMQ, and decompress it.
The decompressed directory is as follows:
apache-rocketmq
├── LICENSE
├── NOTICE
├── README.md
├── benchmark
├── bin
├── conf
└── lib-
Start NameServer
nohup sh bin/mqnamesrv &
tail -f ~/logs/rocketmqlogs/namesrv.log-
Start Broker
nohup sh bin/mqbroker -n localhost:9876 &
tail -f ~/logs/rocketmqlogs/broker.log-
Send and Receive Messages
Send messages:
sh bin/tools.sh org.apache.rocketmq.example.quickstart.ProducerOutput when the message is successfully sent: SendResult [sendStatus=SEND_OK, msgId= …
Receive messages:
sh bin/tools.sh org.apache.rocketmq.example.quickstart.ConsumerOutput when the message is successfully received: ConsumeMessageThread_%d Receive New Messages: [MessageExt…
-
Disable Server
sh bin/mqshutdown broker
sh bin/mqshutdown namesrv
6.3. Introduction of Spring Cloud Stream
Spring Cloud Stream is a microservice framework used to build architectures based on messages. It helps you to create production-ready single-server Spring applications based on SpringBoot, and connects with Broker using Spring Integration.
Spring Cloud Stream provides unified abstractions of message middleware configurations, and puts forward concepts such as publish-subscribe, consumer groups and partition.
There are two concepts in Spring Cloud Stream: Binder and Binding
-
Binder: A component used to integrate with external message middleware, and is used to create binding. Different message middleware products have their own binder implementations.
For example, Kafka uses KafkaMessageChannelBinder, RabbitMQ uses RabbitMessageChannelBinder, while RocketMQ uses RocketMQMessageChannelBinder.
-
Binding: Includes Input Binding and Output Binding.
Binding serves as a bridge between message middleware and the provider and consumer of the applications. Developers only need to use the Provider or Consumer to produce or consume data, and do not need to worry about the interactions with the message middleware.

Now let’s use Spring Cloud Stream to write a simple code for sending and receiving messages:
MessageChannel messageChannel = new DirectChannel();

// Message subscription
((SubscribableChannel) messageChannel).subscribe(new MessageHandler() {
    @Override
    public void handleMessage(Message<? > message) throws MessagingException {
        System.out.println("receive msg: " + message.getPayload());
    }
});

// Message sending
messageChannel.send(MessageBuilder.withPayload("simple msg").build());
All the message types in this code are provided by the `spring-messaging`module. It shields the lower-layer implementations of message middleware. If you would like to change the message middleware, you only need to configure the related message middleware information in the configuration file and modify the binder dependency.
The lower layer of Spring Cloud Stream also implements various code abstractions based on the previous code.
6.4. How to use Spring Cloud Alibaba RocketMQ Binder
For using the Spring Cloud Alibaba RocketMQ Binder, you just need to add it to your Spring Cloud Stream application, using the following Maven coordinates:
<dependency>
  <groupId>com.alibaba.cloud</groupId>
  <artifactId>spring-cloud-stream-binder-rocketmq</artifactId>
</dependency>
Alternatively, you can also use the Spring Cloud Stream RocketMQ Starter:
<dependency>
    <groupId>com.alibaba.cloud</groupId>
    <artifactId>spring-cloud-starter-stream-rocketmq</artifactId>
</dependency>
6.5. How Spring Cloud Alibaba RocketMQ Binder Works
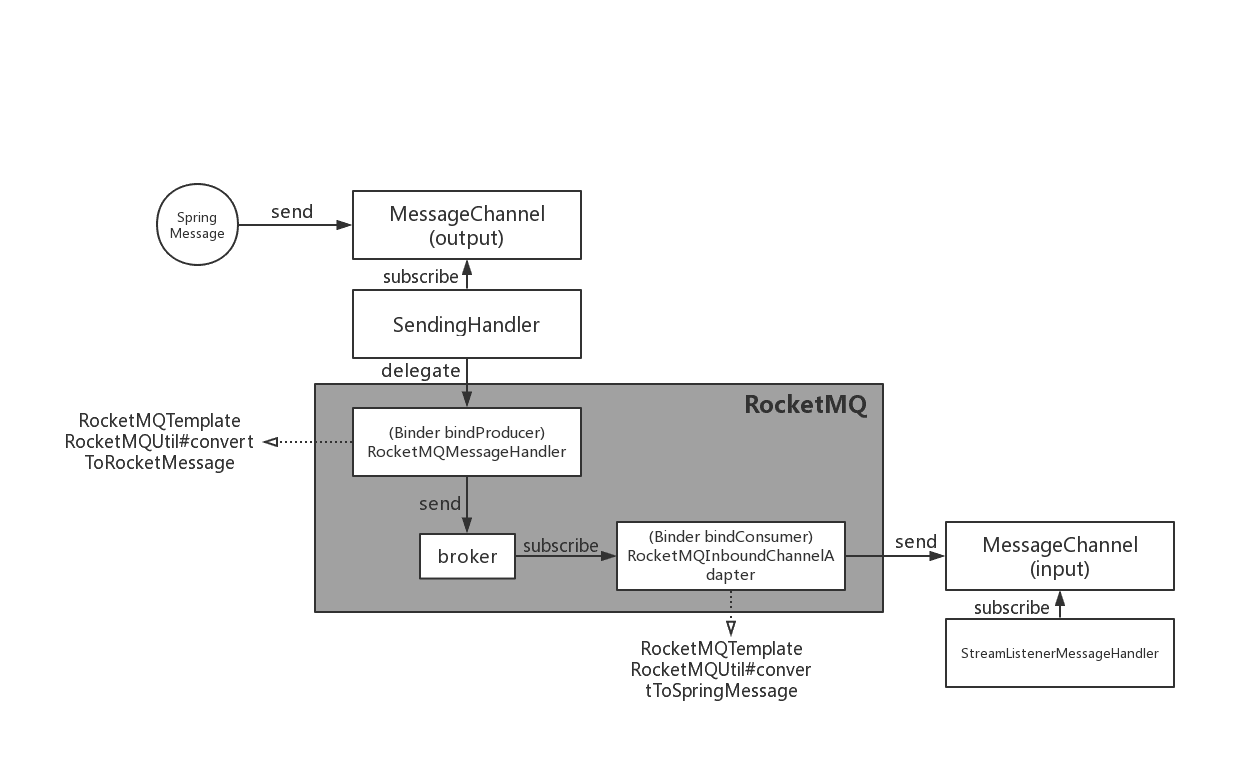
This is the implementation architecture of Spring Cloud Stream RocketMQ Binder:
The implementation of RocketMQ Binder depend on the RocketMQ-Spring framework.
RocketMQ Spring framework is an integration of RocketMQ and Spring Boot. It provides three main features:
-
RocketMQTemplate: Sending messages, including synchronous, asynchronous, and transactional messages. -
@RocketMQTransactionListener: Listen and check for transaction messages. -
@RocketMQMessageListener: Consume messages.
RocketMQMessageChannelBinder is a standard implementation of Binder, it will build RocketMQInboundChannelAdapter and RocketMQMessageHandler internally.
RocketMQMessageHandler will construct RocketMQTemplate based on the Binding configuration. RocketMQTemplate will convert the org.springframework.messaging.Message message class of spring-messaging module to the RocketMQ message class org.apache.rocketmq.common .message.Message internally, then send it out.
RocketMQInboundChannelAdapter will also construct RocketMQListenerBindingContainer based on the Binding configuration, and RocketMQListenerBindingContainer will start the RocketMQ Consumer to receive the messages.
|
Note
|
RocketMQ Binder Application can also be used to configure rocketmq.** to trigger RocketMQ Spring related AutoConfiguration |
Currently Binder supports setting the relevant key in Header to set the properties of the RocketMQ message.
For example, TAGS, DELAY, TRANSACTIONAL_ARG, KEYS, WAIT_STORE_MSG_OK, FLAG represent the labels corresponding to the RocketMQ message.
MessageBuilder builder = MessageBuilder.withPayload(msg)
    .setHeader(RocketMQHeaders.TAGS, "binder")
    .setHeader(RocketMQHeaders.KEYS, "my-key")
    .setHeader(MessageConst.PROPERTY_DELAY_TIME_LEVEL, "1");
Message message = builder.build();
output().send(message);
Or use StreamBridge
MessageBuilder builder = MessageBuilder.withPayload(msg)
    .setHeader(RocketMQHeaders.TAGS, "binder")
    .setHeader(RocketMQHeaders.KEYS, "my-key")
    .setHeader(MessageConst.PROPERTY_DELAY_TIME_LEVEL, "1");
Message message = builder.build();
streamBridge.send("producer-out-0", message);|
Note
|
More Examples: RocketMQ Example |
6.6. Configuration Options
6.6.1. RocketMQ Binder Properties
- spring.cloud.stream.rocketmq.binder.name-server
-
The name server of RocketMQ Server(Older versions use the namesrv-addr configuration item).
Default:
127.0.0.1:9876. - spring.cloud.stream.rocketmq.binder.access-key
-
The AccessKey of Alibaba Cloud Account.
Default: null.
- spring.cloud.stream.rocketmq.binder.secret-key
-
The SecretKey of Alibaba Cloud Account.
Default: null.
- spring.cloud.stream.rocketmq.binder.enable-msg-trace
-
Enable Message Trace feature for all producers and consumers.
Default:
true. - spring.cloud.stream.rocketmq.binder.customized-trace-topic
-
The trace topic for message trace.
Default:
RMQ_SYS_TRACE_TOPIC. - spring.cloud.stream.rocketmq.binder.access-channel
-
The commercial version of rocketmq message trajectory topic is adaptive,the value is CLOUD
Default: null.
6.6.2. RocketMQ Consumer Properties
The following properties are available for RocketMQ producers only and must be prefixed with spring.cloud.stream.rocketmq.bindings.<channelName>.consumer..
- enable
-
Enable Consumer Binding.
Default:
true. - tags
-
Consumer subscription tags expression, tags split by
||.Default: empty.
- sql
-
Consumer subscription sql expression.
Default: empty.
- broadcasting
-
Control message mode, if you want all subscribers receive message all message, broadcasting is a good choice.
Default:
false. - orderly
-
Receiving message concurrently or orderly.
Default:
false. - delayLevelWhenNextConsume
-
Message consume retry strategy for concurrently consume:
-
-1,no retry,put into DLQ directly
-
0,broker control retry frequency
-
>0,client control retry frequency
Default:
0.
-
- suspendCurrentQueueTimeMillis
-
Time interval of message consume retry for orderly consume.
Default:
1000.
6.6.3. RocketMQ Provider Properties
The following properties are available for RocketMQ producers only and must be prefixed with spring.cloud.stream.rocketmq.bindings.<channelName>.producer..
- enable
-
Enable Producer Binding.
Default:
true. - group
-
Producer group name.
Default: empty.
- maxMessageSize
-
Maximum allowed message size in bytes.
Default:
8249344. - transactional
-
Send Transactional Message.
Default:
false. - sync
-
Send message in synchronous mode.
Default:
false. - vipChannelEnabled
-
Send message with vip channel.
Default:
true. - sendMessageTimeout
-
Millis of send message timeout.
Default:
3000. - compressMessageBodyThreshold
-
Compress message body threshold, namely, message body larger than 4k will be compressed on default.
Default:
4096. - retryTimesWhenSendFailed
-
Maximum number of retry to perform internally before claiming sending failure in synchronous mode.
Default:
2. - retryTimesWhenSendAsyncFailed
-
Maximum number of retry to perform internally before claiming sending failure in asynchronous mode.
Default:
2. - retryNextServer
-
Indicate whether to retry another broker on sending failure internally.
Default:
false.
7. Spring Cloud Alibaba Cloud ANS
ANS(Application Naming Service) is a component of EDAS. Spring Cloud Alibaba Cloud ANS provides the commercial version of service registration and discovery in conformity with the Spring Cloud specifications, so that you can develop your applications locally and run them on the cloud.
|
Note
|
EDAS currently supports direct deployment of Nacos Discovery applications |
7.1. How to Introduce Spring Cloud Alibaba Cloud ANS
If you want to use ANS in your project, please use the starter with the group ID as com.alibaba.cloud and the artifact ID as spring-cloud-starter-alicloud-ans.
<dependency>
    <groupId>com.alibaba.cloud</groupId>
    <artifactId>spring-cloud-starter-alicloud-ans</artifactId>
</dependency>
7.2. Use ANS to Register Service
When Spring Cloud AliCloud ANS Starter is introduced on the client, the metadata of the service such as IP, port number and weright will be registered to the registration center automatically. The client will maintain heartbeat with the server to prove that it is capable of providing service properly.
The following is a simple illustration.
@SpringBootApplication
@EnableDiscoveryClient
@RestController
public class ProviderApplication {

    @RequestMapping("/")
    public String home() {
        return "Hello world";
    }

    public static void main(String[] args) {
        SpringApplication.run(ProviderApplication.class, args);
    }

}
As the service will registered to the registration center, we will need to configure the address of the registration center. We also need to add the following address in application.properties.
# The application name will be used as the service name, therefore it is mandatory.
spring.application.name=ans-provider
server.port=18081
# The following is the IP and port number of the registration center.
spring.cloud.alicloud.ans.server-list=127.0.0.1
spring.cloud.alicloud.ans.server-port=8080|
Note
|
By now the registration center is not started yet, so you will get an error message if your application is started. Therefore, start the registration center before you start your application. |
7.3. Start Registration Center
ANS uses two types of registration centers. One is the free lightweight configuration center and the other is the registration center on cloud, which is provided through EDAS. Generally, you can use the lightweight version for application development and local testing, and use EDAS for canary deployment or production.
7.3.1. Start Lightweight Configuration Center
Refer to the Configure Lightweight Configuration Center for details about how to download and install lightweight configuration center.
|
Note
|
You only need to perform step 1(Download lightweight configuration center) and step 2(Start lightweight configuration center). Step 3(Configure hosts) is not required if you use ANS at the same time. |
After you start the lightweight configuration center, start ProviderApplication directly, and you will be able to register your service to the configuration center. The default port of the lightweight configuration center is 8080, therefore you can open http://127.0.0.1:8080, click “Services” on the left and see the registered service.
7.3.2. User Registration Center on the Cloud
Using the registration center on the cloud saves you from the tedious work of server maintenance while at the same time provides a better stability. There is no difference at the code level between using the registration center on cloud and lightweight configuration center, but there are some differences in configurations.
The following is a simple sample of using the registration center on the cloud.
# The application name will be used the service name, and is therefore mandatory.
spring.application.name=ans-provider
# Configure your own port number
server.port=18081
# The following is the IP and port number of the configuration center. The default value is 127.0.0.1 and 8080, so the following lines can be omitted.
spring.cloud.alicloud.ans.server-mode=EDAS
spring.cloud.alicloud.access-key=Your Alibaba Cloud AK
spring.cloud.alicloud.secret-key=Your Alibaba Cloud SK
spring.cloud.alicloud.edas.namespace=cn-xxxxx
The default value of server-mode is LOCAL. If you want to use the registration center on cloud, you need to change it to EDAS.
Access-key and secret-key are the AK/SK of your Alibaba Cloud account. Register an Alibaba Cloud account first and log on to the Cloud Console Alibaba Cloud AK/SK to copy your AccessKey ID and Access Key Secret. If you haven’t created one, click the “Create AccessKey” button.
Namespace is a concept in EDAS, which is used to isolate environments, such as testing environment and production environment. To find your namespace, click to Sign up for EDAS first. You will not be charged under the pay-as-you-go mode. Then log on to the EDAS Console and you will be able to see your namespace, for example cn-hangzhou.
|
Note
|
EDAS provides application hosting service and will fill in all configurations automatically for the hosted applications. |
8. Spring Cloud Alibaba Cloud ACM
Spring Cloud AliCloud ACM is an implementation of the commercial product Application Configuration Management(ACM) in the client side of Spring Cloud, and is free of charge.
Use Spring Cloud AliCloud ACM to quickly access ACM configuration management capabilities based on Spring Cloud’s programming model.
|
Note
|
Currently EDAS already supports direct deployment of the Nacos Config app. |
8.1. How to Introduce Spring Cloud Alibaba Cloud ACM
If you want to use ACM in your project, please use the starter with the group ID as com.alibaba.cloud and the artifact ID as spring-cloud-starter-alicloud-acm.
<dependency>
    <groupId>com.alibaba.cloud</groupId>
    <artifactId>spring-cloud-starter-alicloud-acm</artifactId>
</dependency>
8.2. Use ACM to Manage Configurations
When Spring Cloud Alibaba Cloud ACM Starter is introduced into the client, the application will automatically get configuration information from the configuration management server when it starts, and inject the configuration into Spring Environment.
The following is a simple illustration.
@SpringBootApplication
public class ProviderApplication {

    public static void main(String[] args) {
        ConfigurableApplicationContext applicationContext = SpringApplication.run(ProviderApplication.class, args);
        String userName = applicationContext.getEnvironment().getProperty("user.name");
        String userAge = applicationContext.getEnvironment().getProperty("user.age");
        System.err.println("user name :" +userName+"; age: "+userAge);
    }
}
As we need to obtain configuration information from the configuration server, we will need to configure the address of the server. We also need to add the following information in bootstrap.properties.
# Required. The application name will be used as part of the keyword to get the configuration key from the server.
spring.application.name=acm-config
server.port=18081
# The following is the IP and port number of the configuration server.
spring.cloud.alicloud.acm.server-list=127.0.0.1
spring.cloud.alicloud.acm.server-port=8080|
Note
|
By now the configuration center is not started yet, so you will get an error message if your application is started. Therefore, start the configuration center before you start your application. |
8.2.1. Start Configuration Center
ACM uses two types of configuration centers. One is lightweight configuration center, the other is ACM which is used on Alibaba Cloud. Generally, you can use the lightweight version for application development and local testing, and use ACM for canary deployment or production.
Use Lightweight Configuration Center
Refer to the Configure Lightweight Configuration Center for details about how to download and install lightweight configuration center.
|
Note
|
You only need to perform step 1(Download lightweight configuration center) and step 2(Start lightweight configuration center). |
Use ACM on the Alibaba Cloud
Using ACM on the cloud saves you from the tedious work of server maintenance while at the same time provides a better stability. There is no difference at the code level between using ACM on cloud and lightweight configuration center, but there are some differences in configurations.
The following is a simple sample of using ACM. You can view configuration details on ACM Console
# The application name will be used as part of the keyword to obtain configuration key from the server, and is mandatory.
spring.application.name=acm-config
# Configure your own port number
server.port=18081
# The following is the IP and port number of the configuration center.
spring.cloud.alicloud.acm.server-mode=EDAS
spring.cloud.alicloud.access-key=Your Alibaba Cloud AK
spring.cloud.alicloud.secret-key=Your Alibaba Cloud SK
spring.cloud.alicloud.acm.endpoint=acm.aliyun.com
spring.cloud.alicloud.acm.namespace=Your ACM namespace(You can find the namespace on the ACM console)|
Note
|
EDAS provides application hosting service and will fill in all configurations about ACM automatically for the hosted applications. |
8.2.2. Add Configuration in the Configuration Center
-
After you start the lightweight configuration center, add the following configuration on the console.
Group:      DEFAULT_GROOUP

DataId:     acm-config.properties

Content:    user.name=james
user.age=18|
Note
|
The format of dataId is {prefix}. {file-extension}. “prefix” is obtained from spring.application.name by default, and the value of “file-extension” is "properties” by default.
|
8.2.3. Start Application Verification
Start the following example and you can see that the value printed on the console is the value we configured in the lightweight configuration center.
user name :james; age: 188.3. Modify Configuration File Extension
The default file extension of dataId in spring-cloud-starter-alicloud-acm is properties. In addition to properties, yaml is also supported.
You can set the file extension using spring.cloud.alicloud.acm.file-extension. Just set it to yaml or `yml`for yaml format.
|
Note
|
After you change the file extension, you need to make corresponding format changes in the DataID and content of the configuration center. |
8.4. Dynamic Configuration Refresh
spring-cloud-starter-alicloud-acm supports dynamic configuration updates. RefreshEvent in Spring is published when you update configuration in the configuration center. All classes with @RefreshScope and @ConfigurationProperties annotations will be refreshed automatically.
|
Note
|
You can disable automatic refresh by this setting: spring.cloud.alicloud.acm.refresh.enabled=false |
8.5. Configure Profile Granularity
When configuration is loaded by spring-cloud-starter-alicloud-acm, configuration with DataId {spring.application.name}. {file-extension} will be loaded first. If there is content in spring.profiles.active, the content of spring.profile, and configuration with the dataid format of{spring.application.name}-{profile}. {file-extension} will also be loaded in turn, and the latter has higher priority.
spring.profiles.active is the configuration metadata, and should also be configured in bootstrap.properties or bootstrap.yaml. For example, you can add the following content in bootstrap.properties.
spring.profiles.active={profile-name}
Note: You can also configure the granularity through JVM parameters such as -Dspring.profiles.active=develop or --spring.profiles.active=develop, which have higher priority. Just follow the specifications of Spring Boot.
8.6. Support Custom ACM Timeout
the default timeout of ACM client get config from sever is 3000 ms . If you need to define a timeout, set configuration spring.cloud.alicloud.acm.timeout,the unit is millisecond.
8.7. Support Custom Group Configurations
DEFAULT_GROUP is used by default when no {spring.cloud.alicloud.acm.group} configuration is defined. If you need to define your own group, you can use the following method:
spring.cloud.alicloud.acm.group=DEVELOP_GROUP|
Note
|
This configuration must be placed in the bootstrap.properties file, and the value of Group must be the same with the value of spring.cloud.alicloud.acm.group.
|
8.7.1. Support Shared Configurations
ACM provides a solution to share the same configuration across multiple applications. You can do this by adding the spring.application.group configuration in Bootstrap.
spring.application.group=company.department.teamThen, you application will retrieve configurations from the following DataId in turn before it retrieves its own configuration: company:application.properties, company.department:application.properties, company.department.team:application.properties. After that, it also retrieves configuration from {spring.application.group}: {spring.application.name}. {file-extension} The later in order, the higer the priority, and the unique configuration of the application itself has the highest priority.
|
Note
|
The default suffix of DataId is properties, and you can change it using spring.cloud.alicloud.acm.file-extension. {spring.application.group}: {spring.application.name}. {file-extension} .
|
|
Note
|
If you configured spring.profiles.active , then the DataId format of {spring.application.group}: {spring.application.name}-{spring.profiles.active}. {file-extension} is also supported, and has higher priority than {spring.application.group}: {spring.application.name}. {file-extension}
|
8.8. Actuator Endpoint
the Actuator endpoint of ACM is /acm, config represents the ACM metadata configuration information, runtime.sources corresponds to the configuration information obtained from the ACM server and the last refresh time, runtime.refreshHistory corresponds to the dynamic refresh history.
9. Spring Cloud Alibaba Cloud OSS
OSS(Object Storage Service)is a storage product on Alibaba Cloud. Spring Cloud Alibaba Cloud OSS provides the commercialized storage service in conformity with Spring Cloud specifications. We provide easy-to-use APIs and supports the integration of Resource in the Spring framework.
9.1. How to Introduce Spring Cloud Alibaba Cloud OSS
We’ve released Spring Cloud Alibaba version 0.2.1. You will need to add dependency management POM first.
<dependencyManagement>
    <dependencies>
        <dependency>
            <groupId>com.alibaba.cloud</groupId>
            <artifactId>spring-cloud-alibaba-dependencies</artifactId>
            <version>0.2.2.BUILD-SNAPSHOT</version>
            <type>pom</type>
            <scope>import</scope>
        </dependency>
    </dependencies>
</dependencyManagement>
Next we need to introduce Spring Cloud Alibaba Cloud OSS Starter.
<dependency>
    <groupId>com.alibaba.cloud</groupId>
    <artifactId>spring-cloud-starter-alicloud-oss</artifactId>
</dependency>
9.2. How to Use OSS API
9.2.1. Configure OSS
Before you start to use Spring Cloud Alibaba Cloud OSS, please add the following configurations in application.properties.
spring.cloud.alicloud.access-key=Your Alibaba Cloud AK
spring.cloud.alicloud.secret-key=Your Alibaba Cloud SK
spring.cloud.alicloud.oss.endpoint=***.aliyuncs.com
access-key and secret-key is the AK/SK of your Alibaba Cloud account. If you don’t have one, please register an account first, and log on to Alibaba Cloud AK/SK Management to get your AccessKey ID and Access Key Secret . If you haven’t create the AccessKeys, click “Create AccessKey” to create one.
For endpoint information, please refer to the OSS Documentation and get the endpoint for your region.
9.2.2. Introduce OSS API
The OSS API of Spring Cloud Alibaba Cloud OSS is based on the official OSS SDK, and includes APIs for uploading, downloading, viewing files.
Here is a simple application that uses the OSS API.
@SpringBootApplication
public class OssApplication {

    @Autowired
    private OSS ossClient;

    @RequestMapping("/")
    public String home() {
        ossClient.putObject("bucketName", "fileName", new FileInputStream("/your/local/file/path"));
        return "upload success";
    }

    public static void main(String[] args) throws URISyntaxException {
        SpringApplication.run(OssApplication.class, args);
    }

}
Before you upload your files, please Register an Alibaba Cloud Account. If you already have one, please Sign up for OSS.
Log on to the OSS Console, click “Create New Bucket” and create a bucket as instructed. Replace the bucket name in the “bucketname” of the previous code with your new bucket name. "fileName” can be any name you like, and "/your/local/file/path” can be any local file path. Next you can run `curl http://127.0.0.1:port number/ to upload your files, and you will see your file on the OSS Console.
For more instructions on OSS APIs, please refer to OSS SDK Documentation.
9.3. Integrate with the Resource Specifications of Spring
Spring Cloud Alibaba Cloud OSS integrates the Resource of the Spring framework, which allows you to use the OSS resources easily.
The following is a simple example of how to use Resource.
@SpringBootApplication
public class OssApplication {

    @Value("oss://bucketName/fileName")
    private Resource file;

    @GetMapping("/file")
    public String fileResource() {
        try {
            return "get file resource success. content: " + StreamUtils.copyToString(
                file.getInputStream(), Charset.forName(CharEncoding.UTF_8));
        } catch (Exception e) {
            return "get resource fail: " + e.getMessage();
        }
    }

    public static void main(String[] args) throws URISyntaxException {
        SpringApplication.run(OssApplication.class, args);
    }

}|
Note
|
A prerequisite for the above sample is that you need to have a bucket named “bucketName” on OSS, and you have a file named “fileName” in this bucket. |
9.4. Use STS Authentication
In addition to AccessKeys, Spring Cloud Alibaba Cloud OSS also supports STS authentication. STS is an authentication method with temporary security tokens, and is usually used for a third party to access its resources temporarily.
For a third party to access resources temporarily, it only needs to complete the following configurations.
spring.cloud.alicloud.oss.authorization-mode=STS
spring.cloud.alicloud.oss.endpoint=***.aliyuncs.com
spring.cloud.alicloud.oss.sts.access-key=Your authenticated AK
spring.cloud.alicloud.oss.sts.secret-key=Your authenticated SK
spring.cloud.alicloud.oss.sts.security-token=Your authenticated ST
Among which, spring.cloud.alicloud.oss.authorization-mode is the enumeration type. Fill in STS here means that STS authentication is used. For endpoint information, refer to the OSS Documentation and fill in the endpoint for your region.
Access-key, secret-key and the security-token need to be issued by the authentication side. For more information about STS, refer to STS Documentation.
9.5. More Configurations for the Client
In addition to basic configurations, Spring Cloud Alibaba Cloud OSS also supports many other configurations, which are also included in the application.properties file.
Here are some examples.
spring.cloud.alicloud.oss.authorization-mode=STS
spring.cloud.alicloud.oss.endpoint=***.aliyuncs.com
spring.cloud.alicloud.oss.sts.access-key=Your authenticated AK
spring.cloud.alicloud.oss.sts.secret-key=Your authenticated SK
spring.cloud.alicloud.oss.sts.security-token=Your authenticated ST

spring.cloud.alicloud.oss.config.connection-timeout=3000
spring.cloud.alicloud.oss.config.max-connections=1000
For more configurations, refer to the table at the bottom of OSSClient Configurations.
|
Note
|
In most cases, you need to connect the parameter names with “-” for the parameters in the table of OSSClient Configurations with “-”, and all letters should be in lowercase. For example, ConnectionTimeout should be changed to connection-timeout. |
10. Spring Cloud Alibaba Cloud SchedulerX
SchedulerX(Distributed job scheduling) is a component of EDAS, an Alibaba Cloud product. Spring Cloud Alibaba Cloud SchedulerX provides distributed job scheduling in conformity with the Spring Cloud specifications. SchedulerX provides timed job scheduling service with high accuracy with seconds, high stability and high availabiliy, and supports multiple job types, such as simple single-server jobs, simple multi-host jobs, script jobs, and grid jobs.
10.1. How to Introduce Spring Cloud Alibaba Cloud SchedulerX
If you want to use SchedulerX in your project, please use the starter with the group ID as com.alibaba.cloud and the artifact ID as spring-cloud-starter-alicloud-schedulerX.
<dependency>
    <groupId>com.alibaba.cloud</groupId>
    <artifactId>spring-cloud-starter-alicloud-schedulerX</artifactId>
</dependency>
10.2. Start SchedulerX
After Spring Cloud Alibaba Cloud SchedulerX Starter is introduced into the client, you only need to complete a few simple configurations and you will be able to initialize the SchedulerX service automatically.
The following is a simple example.
@SpringBootApplication
public class ScxApplication {

    public static void main(String[] args) {
        SpringApplication.run(ScxApplication.class, args);
    }

}
Add the following configurations in the application.properties file.
server.port=18033
# cn-test is the test region of SchedulerX
spring.cloud.alicloud.scx.group-id=***
spring.cloud.alicloud.edas.namespace=cn-test
Before getting the group-id, please Register an Alibaba Cloud account, and then Sign up for EDAS and Sign up for SchedulerX as well.
To get the group-id, refer to the SchedulerX Documentation.
|
Note
|
When you create a group, please select the “test” region. |
10.3. Compile a simple job
Simple job is the most commonly used job type. You only need to implement the ScxSimpleJobProcessor interface.
The following is a sample of a simple single-server job.
public class SimpleTask implements ScxSimpleJobProcessor {

	@Override
	public ProcessResult process(ScxSimpleJobContext context) {
		System.out.println("-----------Hello world---------------");
		ProcessResult processResult = new ProcessResult(true);
		return processResult;
	}

}
10.4. Job Scheduling
Go to the SchedulerX Jobs page, select the “Test” region, and click “Create Job” on the upper-right corner to create a job, as shown below.
Job Group: Test——***-*-*-****
Job process interface:SimpleTask
Type: Simple Single-Server Job
Quartz Cron Expression: Default Option——0 * * * * ?
Job Description: Empty
Custom Parameters: Empty
The job above is a “Simple Single-Server Job”, and specified a Cron expression of "0 * * * * ?" . This means that the job will be executed once and once only in every minute.
For more job types, refer to SchedulerX Documentation.
10.5. Usage in Production Environment
The previous examples shows how to use SchedulerX in the “Test” region, which is mainly used for local testing.
At the production level, you need to complete some other configurations in addition to the group-id and namespace as mentioned above. See examples below:
server.port=18033
# cn-test is the test region of SchedulerX
spring.cloud.alicloud.scx.group-id=***
spring.cloud.alicloud.edas.namespace=***
# If your application runs on EDAS, you do not need to configure the following.
spring.cloud.alicloud.access-key=***
spring.cloud.alicloud.secret-key=***
# The following configurations are not mandatory. You can refer to the SchedulerX documentation for details.
spring.cloud.alicloud.scx.domain-name=***
The way to get the group-id is the same as described in the previous examples, and you can get the namespace by clicking “Namespaces” in the left-side navigation pane of the EDAS console.
|
Note
|
Group-id must be created within a namespace. |
Access-key and secret-key are the AK/SK of your Alibaba Cloud account. If you deploy you applications on EDAS, then you do not need to fill in this information. Otherwise please go to Security Information to get your AccessKeys.
Domain-name is not mandatory. You can refer to SchedulerX Documentation for details.
11. Spring Cloud Alibaba Cloud SMS
SMS(Short Message Service)is a messaging service that covers the globe, Alibaba SMS provides convenient, efficient, and intelligent communication capabilities that help businesses quickly contact their customers.
Spring Cloud Alibaba Cloud SMS provide an easier-to-use API for quick access to Alibaba Cloud’s SMS service based on Spring Cloud Alibaba SMS.
11.1. How to Introduce Spring Cloud Alibaba Cloud SMS
If you want to use SMS in your project, please use the starter with the group ID as com.alibaba.cloud and the artifact ID as spring-cloud-starter-alicloud-sms.
<dependency>
    <groupId>com.alibaba.cloud</groupId>
    <artifactId>spring-cloud-starter-alicloud-sms</artifactId>
</dependency>
11.2. How to use SMS API
11.2.1. Configure SMS
Before you start to use Spring Cloud Alibaba Cloud SMS, please add the following configurations in application.properties.
spring.cloud.alicloud.access-key=AK
spring.cloud.alicloud.secret-key=SK
access-key and secret-key is the AK/SK of your Alibaba Cloud account. If you don’t have one, please register an account first, and log on to Alibaba Cloud AK/SK Management to get your AccessKey ID and Access Key Secret . If you haven’t create the AccessKeys, click “Create AccessKey” to create one.
11.2.2. Introduce SMS API
The SMS API in Spring Cloud Alicloud SMS is based on Alibaba Cloud SMS SDK. It has a single SMS sending, multiple SMS bulk sending, SMS query, SMS message (SMS receipt message and Upstream SMS message) class operation API.
The following is a simple example of how to use SMS api to send short message:
@SpringBootApplication
public class SmsApplication {

    @Autowired
    private ISmsService smsService;

    @RequestMapping("/batch-sms-send.do")
    public SendBatchSmsResponse batchsendCheckCode(
            @RequestParam(name = "code") String code) {

        SendSmsRequest request = new SendSmsRequest();
        // Required:the mobile number
        request.setPhoneNumbers("152******");
        // Required:SMS-SignName-could be found in sms console
        request.setSignName("******");
        // Required:Template-could be found in sms console
        request.setTemplateCode("******");
        // Required:The param of sms template.For exmaple, if the template is "Hello,your verification code is ${code}". The param should be like following value
        request.setTemplateParam("{\"code\":\"" + code + "\"}");
        SendSmsResponse sendSmsResponse ;
        try {
            sendSmsResponse = smsService.sendSmsRequest(request);
        }
        catch (ClientException e) {
            e.printStackTrace();
            sendSmsResponse = new SendSmsResponse();
        }
        return sendSmsResponse ;
    }

    public static void main(String[] args) throws URISyntaxException {
        SpringApplication.run(SmsApplication.class, args);
    }

}
Before you send your messages, please Register an Alibaba Cloud Account. If you already have one, please Turn on SMS Service.
For more information about SMS , please refer to the SMS official SMS (SendSms)---JAVA] docs .
|
Note
|
Due to an issue with the earlier SMS sdk version, if the text message fails to be sent, please delete the line of code that contains the explicit MethodType as POST. If you still have problems, please contact us as soon as possible. |
11.3. The Advanced Features of SMS Api
In order to reduce the cost of learning, the API interface of the Spring Cloud Alicloud SMS package is kept as consistent as the API and Example provided by the official website.
-
Batch SMS sending
Refer to the following example to quickly develop a feature with bulk SMS sending. Add the following code in the Controller or create a new Controller:
@RequestMapping("/batch-sms-send.do")
public SendBatchSmsResponse batchsendCheckCode(
        @RequestParam(name = "code") String code) {
    SendBatchSmsRequest request = new SendBatchSmsRequest();
    request.setMethod(MethodType.GET);
    request.setPhoneNumberJson("[\"177********\",\"130********\"]");
    request.setSignNameJson("[\"*******\",\"*******\"]");
    request.setTemplateCode("******");
    request.setTemplateParamJson(
            "[{\"code\":\"" + code + "\"},{\"code\":\"" + code + "\"}]");
    SendBatchSmsResponse sendSmsResponse ;
    try {
        sendSmsResponse = smsService
                .sendSmsBatchRequest(request);
        return sendSmsResponse;
    }
    catch (ClientException e) {
        e.printStackTrace();
        sendSmsResponse =  new SendBatchSmsResponse();
    }
    return sendSmsResponse ;
}|
Note
|
The MethodType of the request is set to GET, which is somewhat different from the example given by the official website. This is because the inconsistent version of the dependent Alibaba Cloud POP API version causes incompatibility issues, set to GET. |
More parameter descriptions can be reference here
-
SMS Query
Refer to the following example to quickly develop a history of sending SMS messages based on a specified number. Add the following code in the Controller or create a new Controller:
@RequestMapping("/query.do")
public QuerySendDetailsResponse querySendDetailsResponse(
        @RequestParam(name = "tel") String telephone) {
    QuerySendDetailsRequest request = new QuerySendDetailsRequest();
    request.setPhoneNumber(telephone);
    request.setSendDate("20190103");
    request.setPageSize(10L);
    request.setCurrentPage(1L);
    try {
        QuerySendDetailsResponse response = smsService.querySendDetails(request);
        return response;
    }
    catch (ClientException e) {
        e.printStackTrace();
    }

    return new QuerySendDetailsResponse();
}
More parameter descriptions can be found at reference here
-
SMS receipt message
By subscribing to the SmsReport SMS status report, you can know the status of each SMS message and whether it knows the status and related information of the terminal user. These efforts have been encapsulated internally by Spring Cloud AliCloud SMS. You only need to complete the following two steps.
1、Configure the queue name for SmsReport in the application.properties configuration file (which can also be application.yaml).
spring.cloud.alicloud.sms.report-queue-name=Alicom-Queue-********-SmsReport
2、Implement the SmsReportMessageListener interface and initialize a Spring Bean.
@Component
public class SmsReportMessageListener
		implements SmsReportMessageListener {

	@Override
	public boolean dealMessage(Message message) {
	    //do something
		System.err.println(this.getClass().getName() + "; " + message.toString());
		return true;
	}
}
More message body format for Message can be reference here.
-
Upstream SMS message
By subscribing to the SmsUp upstream SMS message, you can know the content of the end user replying to the SMS. These efforts have also been packaged by Spring Cloud AliCloud SMS. You only need to complete the following two steps.
1、Configure the queue name for SmsReport in the application.properties configuration file (which can also be application.yaml).
spring.cloud.alicloud.sms.up-queue-name=Alicom-Queue-********-SmsUp2、Implement the SmsUpMessageListener interface and initialize a Spring Bean.
@Component
public class SmsUpMessageListener
		implements org.springframework.cloud.alicloud.sms.SmsUpMessageListener {

	@Override
	public boolean dealMessage(Message message) {
    	//do something
		System.err.println(this.getClass().getName() + "; " + message.toString());
		return true;
	}
}
More message body format for Message can be reference here.